The basis for the fence can be made of brick, wood, metal, concrete. There is another option - pillars for the fence of asbestos-cement pipes. The most commonly used metal. How to protect metal poles from corrosion so that they last for 50 years or more?
Sometimes even after 3 months of erection of the fence, traces of the first corrosion can be seen on poles and logs. Many complain that the pillars of metal pipes rot in 10-20 years. Concrete can save the pipes, then only if it is brought out above the ground level so that water does not fall and stagnate. How to avoid corrosion at the bottom of the structure?
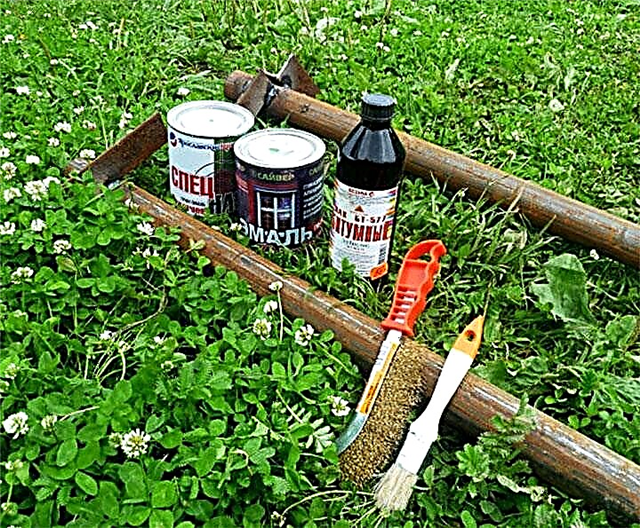
It is possible to treat the posts with a primer for metal and then paint them with enamel or bitumen varnish (in cans). However, the enamel is fragile and is not quite suitable for the fence. There are other, cheaper and more reliable ways.
Fence poles can be square, round, rectangular in shape. There are screw. Round pipes are cheaper and stronger than a profile. Most often use a size of 57x3.5. The thicker the pipe, the longer the service life.
1 protection option
Typically, the posts do this: dig a hole, install a pole (pre-coat with a primer) and fill the hole with concrete. The lower part remains unprotected.
Primer and enamel will not save. Therefore, you can do so.
You will need an empty plastic bottle, cement mortar, trowel. A metal pole is installed. The solution is poured into the pit. Formwork is made from a plastic bottle. Cut off the neck of the bottle and the bottom. Then cut the bottle lengthwise and put it on the pipe, when the solution has not yet hardened. Then, solution is poured into the formwork from the bottle. This method is useful for the construction of various structures, including fence posts.
2 way of protection
Do-it-yourself anti-corrosion coating made of plastic. It will take any pieces of plastic. For example, an old case from a computer system unit, etc. Prepare a container for preparing a liquid solution.
Using pliers, break the plastic (as small as possible). You can use plexiglass. Dissolve the plastic with xylene. If you use plexiglass, then solvent 646 and a little xylene are suitable for it. It will dissolve in a day.
Fill the plastic with solvent and close the lid tightly. Leave for a day, two. If the liquid is too thin, leave the lid open so that the solvent evaporates. If thick - add xylene.
Profile pipes
Made from mild steel. There are round, square and rectangular sections.
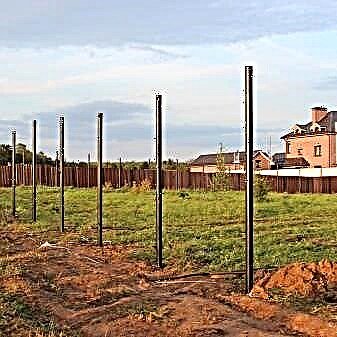
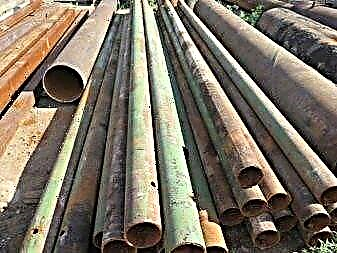
 Photo: future fence posts
They are actively taken for fences for a number of reasons:
- In the variant with a rectangular section to their faces, it is easier to mount sections. For this, special brackets are used and no welding machine is needed.
- Great view on both sides.
- Affordable price.
- Stiffeners increase the stability of the fence under the influence of strong winds.
Available in lengths from 2.5 to 6 m. Wall thickness 2–4 mm.
Suitable for fences of varying complexity.
Round pipes
Of the pipes the cheapest. Both new and used are sold. Length from 2.5 to 6 m. Diameter - 57–108 mm.
To install such columns and fasten to sections will have to be welded.
Photo. When choosing recyclables, attention should be paid to the amount of corrosion. If this is just a red rust coating, then everything is in order - such material will last a long time. If pipes are found with significant damage to the metal - through corrosion, it is better to abandon them. Or cut off such pieces if length permits.
The semicircular surface is inconvenient when drilling holes, the rigidity of the part is reduced.
To increase the stability of the fasteners, you can take metal or plastic clamps and fix with them a pole and sectional material. Simplify the installation of stabilizing plates.
Screw piles
It is recommended to install on marshy soils with a high peat content, since other types of supports on this soil will begin to deform.
They cost more profile and round. You can try to make them yourself with the help of welding from a standard round pipe, a steel cut ring.
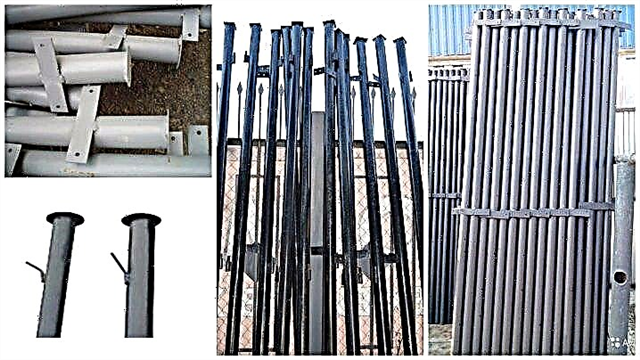
 Photo: manufacturing of screw piles
You will learn about other features of fence supports from this article: “A wooden fence on metal poles”.
IN as columns, the channel, corners, rails, I-beams are still used. They are inexpensively sold at metal collection points. In terms of strength and durability, they are not inferior to pipes, they lose only externally.
Cross section (diameter)
Come with the following types of sections:
- Round. The cheapest option. Available in heights from 2.5 to 4 m. Diameter 57–108 mm. The wall thickness is 3.5 mm. For fencing, pipes with a cross section of 57, 76 mm are more often taken.

- Square. It is much more convenient to install, but much more expensive. They are produced in lengths from 2.5 to 4 m. The size of the sides is 60–100 mm. The wall thickness is 2–4 mm. For fence supports, 60 * 60 mm is well suited.
- Rectangular By manufactured dimensions similar to square.

The main difference is the shape of the pipe.
The racks to which gates with a wicket door will be mounted should have a larger section, since they are subjected to increased load. When using profile pipes of rectangular section, 100 * 120 mm is enough, the recommended diameter of round pipes is from 109 mm.
For the fence, the section of the corners is from 90 mm, the channel from 160 mm. At the construction site with the gates by welding, they are connected into a box.
Height
The total height of the fence is determined by the purpose of the sectional material. If the structure will be installed on the border with a neighboring site, it is better to get the approval of neighbors before the start of construction in order to avoid conflicts.
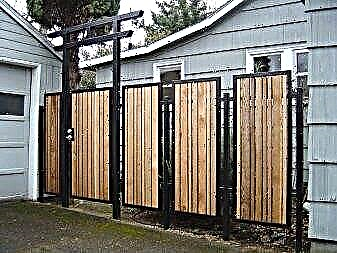
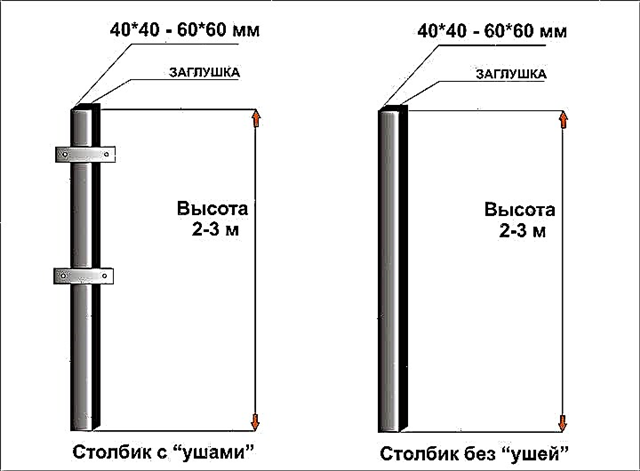 Left: a column with “ears”, size 40x40 - 60x60 mm. Right: a column without "ears", size 40x40 - 60x60 mm.
The optimal height of the fence is up to 2 m.
To calculate the length of the posts, you need to add to the total height of the fence the depth of soil freezing and another plus 20 cm. At the same time, at least ⅓ of the support should be underground.
That is, for a 2 m structure, it is better to take 3 m columns and dig them into the ground by one meter. This is convenient and in order to save money, because the standard metal rolling of 6 m can be cut into 2 flat parts.
The number of supports depends on the installation interval. The recommended step is 2.5 m.
Methods for installing metal poles
For fences with different loads, several methods of fixing the supports are used.
If the fence is light, then the racks are allowed to just dig in. In the case of massive structures, the supports will have to be concrete concreted or pour the foundation.
We will analyze the nuances of each method.
 From left to right. 1 - Driving into the ground. 2 - Combined installation. 3 - Buting. 4 - Full buthing.
Buting (backing)
On heaving soils, it will be correct to dig pillars, using butting with rubble and sand. Crushed stone compensates for the pressure on the support, due to which the racks remain unchanged and the structure does not deform.
But it is recommended to make a backing under light fences made of wood, netting. Under more massive reinforcement of concrete will be required.
It is considered a budget and fast way to fasten the supports.
For bottling, they’ll fit:
- broken brick, tiles,
- medium, large gravel,
- gravel.
 Photo: Dirty Pillar
The procedure is as follows:
- In marked places under each support we dig a hole. In diameter, we do on average 15 cm wider than the cross-section of the rack.
- We ram the bottom, fill it with a small layer of crushed stone, sand.
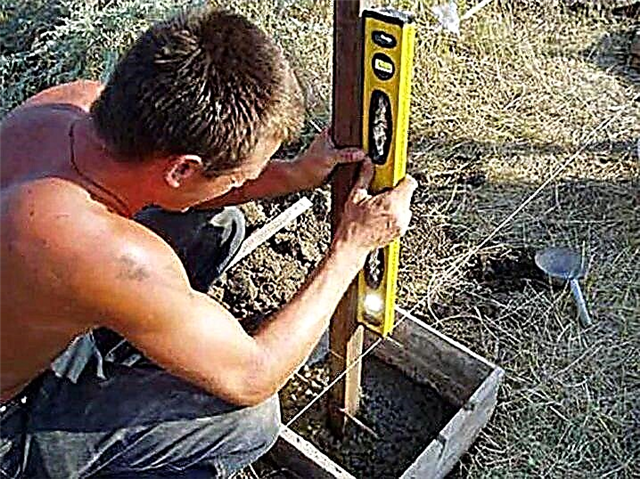
- We expose the column strictly vertically, checking with the help of the level. At this stage, it is better to attract an assistant.
- We begin to fill the pit with crushed stone, sand in small layers, spilling the layers with water. Ramming Each time we check the verticality of the support.
- Sprinkle the pit on top of the earth, compact.
For reliability, experienced builders recommend pouring a liquid solution of clay into the pits between the layers of stones. It fills all the free space, and in the frozen state it is not inferior in strength to concrete.
Concreting
A more reliable method of mounting supports than backing. Its advantages:
- Durability. The life of the fence, subject to technology - from 30 to 50 years.
- Suitable for most stable soils.
- Concreting is used in the construction of structures of any weight.
- concrete hardens for a long time (up to 2 weeks),
- laborious way
- a lot is spent on the purchase of ingredients for mortar, waterproofing, reinforcing,
- for kneading you need a concrete mixer or a construction mixer.
For dry soil, it is better to buy concrete of the M100 brand, for wet soil - M150.
If you know the quantity, depth of the pits under the supports, then it is easy to calculate what the flow rate of the solution will be. So, up to 4 large buckets of ready-made concrete are placed in a 1-meter-deep well.
From the materials you will still need:
- roofing material or plastic film,
- sand,
- thick wire rods, fittings.
If there is no possibility to acquire a concrete mixer, then it is allowed to knead the solution manually in the trough with a shovel.
For anchoring iron or other metal posts, a welding machine with a mask, electrodes is required.
Do not forget that before installing the supports they should be treated with a corrosion inhibitor, otherwise they will rust.
You need to start with the installation of corner posts, to which the gate with the gate is fixed, and only then move on to the intermediate ones.
 Photo: concrete pillar
- We dig holes under the posts with a shovel or drill a drill. We ram the bottom.
- Pour a thin layer of sand. Spill with water. We ram again.
- We set the support vertically. Check the evenness of the level.
- It is better to weld pieces of corners on both sides to the bottom so that they rest firmly on the ground. So the pillars will be more securely fixed.
- We cover the bottom of the pit wall with roofing material or plastic wrap. This is necessary so that the liquid solution remains in the well and does not spread.
- We are preparing a solution. We carry out filling.
- Until the concrete has frozen, we adjust the position of the pillars so that they stand strictly vertically.
Further assembly of the fence is allowed only after the concrete has completely solidified, and this is not earlier than after 2 weeks.
At this time, you can do painting racks.
Partial concreting
There are two types:
- Concrete collar pouring. It is recommended on dry, stable and not loose soils.
- Well filling below freezing. A good option for heaving soils. The upper part of the earth is replaced by crushed stone, and a monolith made of concrete located below the freezing boundary does not allow frost to push the support out of the ground.


Concrete collar
It is created in the following sequence:
- We dig a hole half less than the required depth, in diameter at least 20 cm wider than the column.
- We place the support in the center of the well and drive it to the desired depth indicator. It is better to mark this place on a support in advance with a marker.
- The soil around the ram. Pour a small layer of sand.
- Similarly to full concreting, we carry out anchoring (metal corners welded on the sides), covered with roofing material.
- We fill the pit to the top with concrete.
We are waiting for complete solidification.
Well filling below freezing point
It is carried out as follows:
- Knowing the exact indicator of the depth of freezing of the soil, we drill a hole 60–70 cm lower with a brown.
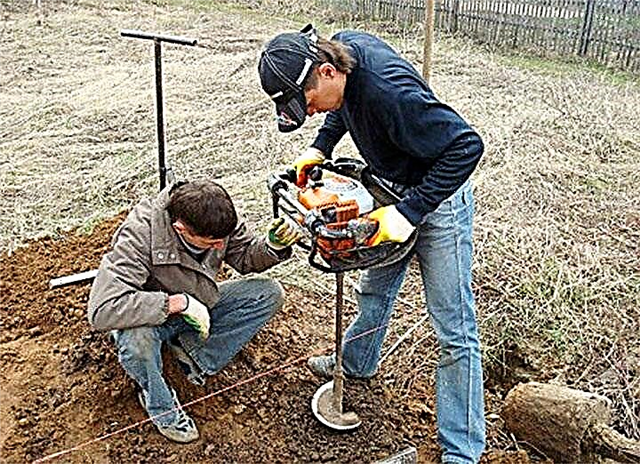 Photo: use of a manual gasoline pit for drilling holes
So the pillars will stand much longer, and under the influence of frost the fence will not begin to deform.
Clogging
This method is advisable to apply in the following situations:
- if the site is hard, rocky soil,
- for the construction of temporary or decorative (around the flower garden, flower beds) fences,
- with fences up to 1.5 m high,
- if the sections are selected netting, PVC mesh and other lightweight material.
The advantages of clogging are the speed of assembly of the structure and the minimum cost of money.
 Photo: the use of "grandmother" for driving posts
An important disadvantage is fragility. When using solid sheets of material under the influence of wind, the poles will soon begin to tilt. This method of fastening does not allow the supports to withstand heavy loads.
First of all, you should inspect the racks, if rusty areas are found, clean, degrease, completely cover with an anti-corrosion primer, treat the lower part with bitumen.
The next step is the markup. It is carried out with the help of pegs and rope from corner posts to intermediate ones.
After the installation procedure is as follows:
- In the marked places we drill wells of the required depth. But the drill diameter should be 4–5 cm less than the pipe section. We hold the tool strictly vertically so that the walls of the well do not begin to spill.
- We ram the bottom. We fall asleep a small layer of sand, gravel.
- Clog the pillars better together. One tries to hold the support as vertically as possible, the other - with a sledgehammer, hammer the rack to the required level.
 Photo: hammer a pole with a sledgehammer
Having scored the first and last pole, it is recommended to pull the rope between them at the top, so that when installing the next ones, control the upper level.
With a strip foundation
This method establishes supports when the site is located near wetlands, with a high level of occurrence of groundwater or near a pond. But it must be taken into account that in the flooded areas its depth should not be less than 1 m, width - from 30 cm.
In the prepared trench with the help of formwork, nests are created for pillars measuring 40 * 40 cm, depth from 1 m, are set according to the level of support.
The next step is reinforcement. Need fittings with a diameter of 10-16 mm.
It is carried out in two ways:
- Wireframe. The rods are cut to the desired length, welded into boxes.
- Continuous. A solid frame is knitted or welded from the wire, which runs along the perimeter of the foundation. It is important not to forget to close the structure so that it does not part with time.
 Photo: tape reinforcement
The tape is filled with concrete mortar. Hardening time - up to 3 weeks.
How to protect metal from corrosion
So that the metal can withstand the effects of the external environment, in the conditions of production it is subjected to hot galvanizing or coated with a polymer layer. Double protection is possible using both methods. Such poles will cost much more than ordinary ones, but they will also last for tens of years longer.
If you have at your disposal ordinary non-galvanized supports, then they must be protected from corrosion, otherwise when interacting with oxygen and moisture, the metal starts to oxidize and rust.
For processing the lower part of the support, it is worth using bitumen or polymer mastic. Solutions are inexpensive. The second type is made specifically for metal surfaces. The coating is carried out in 1-2 layers, allowed to dry, and only then can the supports be deepened.
To protect the entire support, a budget bitumen varnish is purchased in its entirety.
 Photo: support treated with bitumen varnish
- The pipe is cleaned of dirt, get rid of rust. If necessary, the pillar can be washed with soapy water.
- On a dried surface they pass with a solvent, degreasing it.
- A layer of bitumen varnish is applied. It is most convenient to do this with a brush. If the consistency is viscous, then it should be slightly diluted with white spirit.
An alternative to varnish is paints for metal. On sale there are three types:
- Conventional Enamels. The surface must be primed before painting. Reliable is the primer GF-021, which will create a solid base coat. Enamel is applied in 1-2 layers depending on the desired brightness. The coating can last up to 5 years, after which it will have to be updated.
- Enamel primer. A universal tool that has a primer and paint. The surface before application is sufficient to clean from rust, dirt and degrease. Pillars should be painted in 1-2 layers.
- Enamel on rust. An expensive tool that allows you to process corrosive metal even without preliminary cleaning. Stops the development of rust, protects against further oxidation.
But this is not a complete list of varieties of paints that are suitable for processing metal pillars. You can familiarize yourself with a detailed description, recommendations for applying other products here: "How and how to paint a metal fence."
Supports made of high-quality metal, installed in accordance with the requirements and passed anti-corrosion treatment, will serve as a reliable basis for a durable fence.
Nuances of selection

Fencing frame made of metal pipes
Metal pipes are used as supports for various types of fences:
- Wooden structures are mounted on pre-installed pipes with their own hands. And what is noteworthy, the boards can be replaced several times, and the metal poles for the fence made of wood remain irreplaceable for a long time, provided they are correctly installed and processed. This type of fencing is popular for its low cost and environmental friendliness. The diameter of the pipe is used depending on the weight of the structure from 51 mm to 76 mm and more.
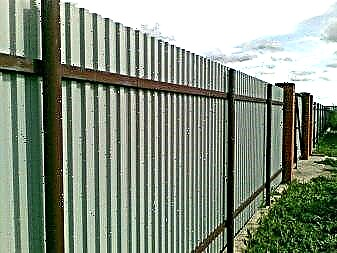
- For fencing from corrugated board there is no better material than metal for supports. It is also used in combined structures with brick pillars, inside of which metal elements are installed. For structures from corrugated board, pipes of square or rectangular section from 60 * 60 mm or 60 * 40 mm are used more often. The inner pipes of brick pillars can also be round in diameter from 51 and above.
- Mesh netting whether it is a tension or sectional, securely mounted on metal poles, with proper care has an almost unlimited service life. For such light fences, pipes with a diameter of 51 mm or more, deepened to the proper level, will be sufficient.
- Forged fences simply oblige to install metal pipes as supports. In addition to their reliability, forged fences are distinguished by a presentable appearance. For such heavy structures, pipes with a diameter of 81 mm are used.
- For heavier and more solid structures, for example, for gates and gates, pipes with a large diameter of 108 mm or anchor posts are used.
As it turned out, the dimensions of the metal supports are selected depending on the weight of the future design. And the stronger the metal, the more reliable the poles will be installed, the longer any fence will last.
It is probably worth noting that the profile galvanized fence posts are more durable, reliable and durable. In addition, they do not require additional processing, since galvanization forms a good protective layer.
For fences, the length of the supports is also considered an important component. It is the height of the fence plus the depth of immersion, which depends on the complexity of the soil. This value varies from 80 cm to 1.5 m.
Characteristic
All supports should have the following properties:
- Strength. Since, in fact, it is they who bear the entire burden that the fence experiences from weather events, the actions of people and animals.


- Sustainability. In addition to external influences, they must withstand the weight of structures attached to them.
- Universality. Since the intake spans can vary in appearance and material of manufacture, the poles must withstand any of their types.

In addition to the fact that metal poles meet all of the above requirements - that is, they are quite durable, stable and suitable for different types of fences in terms of technical characteristics and style, they have another important advantage - they have a sufficiently long service life, during which they do not require large investments in repair and restoration. We can say that such an acquisition is really profitable, since the ratio of their price and quality is optimal.
Among the shortcomings can be noted the complexity of installation for people who do not have skills and experience in this field. In order for the entire structure to be installed really correctly and problems during operation do not arise, you must resort to the services of a specialist.
A modern pillar is a hollow pipe inside, the end (section) of which has the form:
- Round. Have the most affordable cost. People unaware of this issue may have a question about how to attach a fence to a rather sloping side. To do this, stabilizing parts in the form of plates are welded to it. In addition to them, plugs are needed that will prevent moisture from getting inside.
- Square or rectangular. They are most convenient to use and suitable for completely different materials. In addition, design features in the form of additional stiffening ribs are another advantage of this form. This increases their cost and, importantly, reliability.


The thickness of the metal also varies. The most popular options are from 2 to 4 mm. Pipes are available in lengths from 2.5 to 6 meters. Custom made by cutting the product to your desired height. The length of the product that you need is equal to the sum of the height of the fence and the depth of freezing of the earth with an increase of 15-20 cm. If you cannot find this indicator, keep in mind that at least a third of the entire length should be underground.
The diameter of the pipes varies from 5 to 10 cm. To select the correct thickness of the pipe, you need to measure the estimated distance between two adjacent posts and calculate the mass of material used for each span.
If there are no funds for the purchase of special pipes, you can use any other suitable ones, even those that were in use (for example, from a water supply and heating system). The main thing is that they are in good condition and resistant to corrosion.

In appearance, the pipes can be:
- Unprocessed. In addition to an unaesthetic appearance, the surface can oxidize under the influence of oxygen and water or react with chemical elements contained in the soil.


- Coated. In production, the surfaces of future metal poles are coated with polymers or galvanized (there are models with both types of protection). Such measures effectively protect against corrosion. Immediately prior to installation, the support can be treated with bitumen or mastic designed specifically for metals.

Enamels or varnishes are used for decoration. Today, their choice is huge - they can be ordinary or combine the functions of a primer (which greatly facilitates the painting process itself). In addition to creating an image suitable for the general style of the house, such paints will significantly extend the life of the fence. Particular attention must be paid welding seams. They need to be painted over especially carefully.
Mounting
Before installation, it is necessary to calculate the required amount of material and draw up a diagram of their rational location. In accordance with building codes, the optimum span length is a value not exceeding 2.5 meters.

As the main methods of installing metal supports for the fence, driving, screwing, butting, concreting are used.
The choice of one or another option depends on the condition of the soil and the total weight of all the fence materials.

If the fencing system is light and the soil is sandy, the pole can be driven in with a sledgehammer or other technical means. This option is suitable for temporary structures, as it is easier to dismantle. The process itself is as follows: first, a pillar is placed in a small depression (in accordance with the marking) and they begin to strike, periodically checking the correctness of its position.
Wherein you can’t just hit the top. So that it does not deform, use special devices. It is better if at the same time someone else is present who could control the slightest deviations from the vertical. Not only how the fence will look like, but also the possibility of its correct installation in general depends on this. A deviation of several degrees may make the installation of other parts impossible.

Threaded posts or blades can be screwed in if the soil allows. In this case, it will not be easy to remove them, so the construction should be long-term.

If the soil crumbles, the problem will be solved buting. Crushed stone, broken brick, sand or other suitable building materials are poured into a hole wide enough for tamping. The cost of the process can be the use of construction waste. Such a layer should be at least 15 cm. A pillar is installed on this base and aligned. Each subsequent layer must be carefully tamped and watered. You can alternate materials in layers. The last 15 cm are concreted.

Full concreting is suitable in cases where heavy loads are expected (the weight of the materials is quite large and plus the soil is unstable, prone to swelling). The width of the pit should be greater than the diameter of the column by 15-20 cm. Crushed stone is poured into it and rammed. Then make the formwork of wood and pour concrete. A week later, the formwork is removed. If they make the foundation for the fence, the posts are installed when it is poured.

Sometimes a mixed method is used. Its essence lies in the fact that a hole is drilled only at half the estimated depth. The column is driven to the mark, after which the building material is poured, the formwork is built and concrete is poured from above.
Selection rules
Focusing on the appearance of the fence, the pillars can be selected in such a way that they practically do not stand out against the general background. This is also facilitated by painting the entire fencing system in one color.
In addition, they can be completely hidden from the eyes of passers-by behind the corrugated board that is so popular in our time, which they perfectly complement and provide reliability to the whole structure.
Another option, in which a heavy load is placed on the supports, is a fence with forged parts. In this case, it is important to maintain one style of performance and decoration for the entire ensemble.
The use of metal pillars does not at all imply that the fence itself should be made of the same material. It looks especially impressive contrast of metal frame and wooden sections. Making out the territory of a country house in the ranch style, it is sometimes worth replacing a tree with more reliable metal. This will not worsen its appearance, but it will increase the service life.


Most often they are placed at the gates and gates, that is, in places of greatest load. In this case, their shape may be more intricate, and the tops are decorated with curly details.
In the event that the fence performs a more decorative function than the protective one, the requirements for small posts remain the same. The whole structure must be safe and at the same time beautiful and elegant, especially if we are talking about the fencing of a building with an attractive facade.
See how to install fencing on driven supports in the next video.
Shape selection
Metal fence posts are made of ordinary steel pipes, which can have a different cross section:
A pipe with a round cross section is the most budgetary. The length of products sold from the manufacturer is 2.5 ... 6.0 meters. The diameter of round steel is 57 ... 108 mm. When choosing such supports, it is necessary to purchase stabilizing plates to make possible and convenient the process of fastening the fence to the post.
Square and rectangular pipes are more expensive, but also durable: their stiffening ribs provide stability to the supports under the action of loads. The wall thickness of the pipes for the columns varies from 2 to 4 mm. Billets, like round pipes, are available in lengths of 2.5 ... 6.0 meters with minor allowances.
Rectangular and square pipes can be used for different types of fences. To select a suitable cross-sectional size, select the appropriate span between the supports and calculate the approximate weight of the material (picket fence, profiled sheet, etc.)
| Pipe section, mm | Maximum permissible load on the supports, kg | |||||
| 1 meter | 2 meters | 3 meters | 4 meters | 5 meters | 6 meters | |
| 40×40×2 | 709 | 173 | 72 | 35 | 16 | 5 |
| 40×40×3 | 949 | 231 | 96 | 46 | 21 | 6 |
| 50×50×2 | 1165 | 286 | 120 | 61 | 31 | 14 |
| 50×50×3 | 1615 | 396 | 167 | 84 | 43 | 19 |
| 60×60×2 | 1714 | 422 | 180 | 93 | 50 | 26 |
| 60×60×3 | 2393 | 589 | 250 | 129 | 69 | 35 |
| 80×80×3 | 4492 | 1110 | 478 | 252 | 144 | 82 |
| 100×100×3 | 7473 | 1851 | 803 | 430 | 253 | 152 |
| 100×100×4 | 9217 | 2283 | 990 | 529 | 310 | 185 |
| 120×120×4 | 13726 | 3339 | 1484 | 801 | 487 | 296 |
| 140×140×4 | 19062 | 4736 | 2069 | 1125 | 679 | 429 |
Corrosion Protection Methods
Metal without protection quickly corrodes and loses strength, spoiling the appearance of the fence posts. To prevent this phenomenon and extend the life of the metal pipe, its surface is galvanized by hot immersion in a zinc solution. The finished surface does not react with oxygen, water and chemical compounds in air and soil.
Another way to protect pipes in production is by coating with polymer films. They are applied in a thin layer on the surface of the metal. This isolation method is effective for an almost unlimited amount of time, provided the integrity of the layer.
The most reliable pipes have double protection with zinc and polymers at the same time.
Even the highest quality protective coating is not able to withstand the elements of the earth for a long time and soon the galvanization and the polymer layer are broken, the oxidation of the metal begins. To exclude this process, the buried part of the column must be additionally isolated from the aggressive environment.
How to process metal poles for fence in the ground:
- Bitumen mastic,
- Special polymer mastic for metal processing.
The choice is small, but these tools are highly effective and inexpensive. Coating is carried out at the stage of preparation for the construction of the fence. It is necessary to allow the mastic to dry before deepening the structure. Roll materials are completely ineffective, so installing them in a drilled hole is pointless.
Pipe length determination

Before purchasing pipes for installing supports, it is necessary to correctly calculate their length and quantity.
The length of the pipe for clogging is calculated as follows: fence height + depth of freezing of the soil + 20 cm. It should be noted that the length of the pipe underground should be at least 1/3 of the height of the upper part.
Example: the height of our fence is 2.0 meters. The depth of soil freezing in the region is 1.2 meters. We get: 2.0 + 1.2 + 0.2 = 3.4 meters. This length should be our workpiece.
Manufacturers release pipes of unmeasured lengths; you can purchase a workpiece of the closest size - 4.0 meters and cut it yourself or order a trimmer from the seller. If there is a better offer for a long length, for example, 10.5 meters at a low price in terms of 1 segment, we can buy a pipe and cut it into 3 parts (in our case 3.4 × 3 = 10.2 meters, we 10.5 meter pipe fits). You should focus on the price of products and the range offered by the seller.
The distance between the fence posts should not exceed 2.5 meters. It is necessary to draw up a plan of the location of the support pipes in advance and calculate their number.
Installation of metal posts for the fence
There are several ways to install metal poles for the fence:
- Driving and screwing into the ground,
- Buting of a support,
- Concreting pillars,
- The combined method.
The choice of installation method depends on the type of soil and the load on the supports from the fence.
Pole driving
Under light fences on sandy soil, pillars can be driven into the ground. This will require only pipes and a sledgehammer, you should also find the head for the pipe so as not to crush the surface of the section.
Work should be done with a partner.A small hole is dug in a previously marked place. A pipe is inserted into it, then one holds the pillar strictly vertically, the second clogs. Every few strokes, it is necessary to check the verticality of the support.
The advantage of the installation by the clogging method is the possibility of trouble-free dismantling of the supports.
Screwing in the posts is suitable for installing round pipes. For this, 1-2 blades are welded to the lower end. Next, the support is screwed to a predetermined depth. This method is suitable for installing a permanent fence, since dismantling the poles will be very difficult.
Buting of a support (dry concreting)
With heaving soils under an easy fence, it is advisable to choose the installation of metal poles by butting with large gravel and sand.
- 1) First, mount the corner supports and poles on which the gate and gate will be mounted. Stronger pipes are chosen for them,
- 2) Next, the installation of intermediate support pipes.
How to dig metal poles for the fence:
- In the marked place by means of a drill, recesses are made under the supports. The diameter of the pits is optimal to take 20-40 cm, so that there is enough space for falling asleep and ramming crushed stone.
- A layer of rubble and sand 10-15 cm is laid on the bottom of the hole.
- Install the pillar, align its verticality.
- A layer of crushed stone and sand is poured into the pit 15-20 cm in layers, compacted and watered, each time checking the vertical level of the support.
- When 15-20 cm remains to the surface of the earth, the top of the pit is poured with concrete M100-M150.
When soil is heaving, crushed stone compensates for the pressure supplied to the column and the support remains in place, the fence does not emerge from the soil.
Combined installation method (partial concreting)
For heaving soils, you can choose the method of partial concreting of metal columns. It, like the previous method, is suitable both for the strip foundation, and for the point installation of poles.
- Dig a hole at 1/2 or 2/3 of the design depth.
- Clog the pipe to the design mark.
- They make a crushed stone pillow for concrete 10-15 cm.
- They put the formwork and install the frame as in the method of full concreting.
- Pour concrete mortar.
- After 5-7 days, the formwork is removed and the pit is covered with soil.
Bitumen varnish painting
Bitumen varnish is one of the most affordable metal processing products.
- The pipe must be thoroughly degreased and cleaned of impurities. If necessary, it can be washed with soapy water, then dried thoroughly.
- They brush off the rust with a metal brush and create a relief for reliable adhesion of the composition to the base.
- After cleaning the pipes, wipe with a cloth moistened with solvent.
- It is possible to apply bitumen varnish. If its consistency is very thick, it is diluted with white spirit. The solution is applied with a brush in 1-2 layers.
Enamel on metal
Paints for metal are made into 3 groups:
- 1) Primer-enamels - independent means that combine the functions of a primer and a top coat. Enamels are applied on a preliminary fat-free surface in 1-2 layers. With proper application and compliance with operating conditions, the coating can serve for several years, protecting the metal from corrosion.
- 2) Conventional enamels that require additional priming. As the base layer, the primer GF-021 is used, which is applied to the metal in 1 layer. After drying, color enamel is applied in 1-2 layers, depending on the desired color intensity.
- 3) Rust enamels - a modern product that does not require priming and preliminary cleaning of the surface from rust. The composition neutralizes the foci of corrosion and protects the metal from subsequent oxidation.
All compounds are available for purchase in any building materials stores.
Four installation methods

Schematic representation of installation types of metal supports
Whatever method of installing the pipes with your own hands may be chosen, first you need to determine their location, that is, mark the perimeter of the site. To do this, the installation area is cleared, pegs are installed in the corners, the construction thread is pulled and the total number of columns is calculated, depending on the span width. A width of 2–2.5 m is considered optimal. It is at such a distance that it is easier to fix any casing.
And further actions are determined by the installation method:
- the support is driven into the ground by digging or drilling half the depth of the column. After which the support is installed in the hole and clogged,
- combined diving is based on digging out half the depth of the pits, which make up twice the width of the support, installing and driving to the desired depth of the supports, filling and tamping crushed stone,
- buting involves digging holes to the full depth, filling the bottom of the pit with rubble, installing a support and completely filling the voids with rubble, which subsequently requires tamping,
- full concreting is carried out, like the previous method, but the voids are poured with concrete.
The choice of method depends on the condition of the soil on the site. But the most reliable, apart from the arrangement of the foundation, can be called full concreting, which we will stop at.
Stages of reliable installation
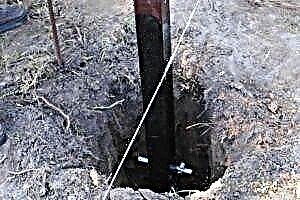
Installation of metal poles by concreting method
Do-it-yourself installation of metal supports starts with their corrosion protection. The part that will be immersed in the ground is treated with protective equipment, for complete assurance of their durability, many also wrap the bottom of the pipe in a roofing material or from the same roofing material make a “glass” inside the hole.
Do-it-yourself pit preparation continues by the fact that after drilling the hole to the desired depth, twice the width of the pipe, a sand-gravel pad is required for a thickness of 10–20 cm.
After installing the pipe, inside the hole it is fixed with an arm belt or metal stops. Leveled pipes are poured in layers in concrete. Each poured layer requires careful tamping.
It will take at least 24 hours to completely harden the concrete. Before attaching the sheathing, it is necessary to paint the pipes and allow them to dry.
Self painting

Primer treatment of metal support before painting
Often, in order to save money, rusty used pipes are used. There is nothing wrong with this approach to the selection of support elements. Only the metal thickness is important, which should be at least 2 mm. The service life of these products will be no less than new pipes, if they are properly prepared.
If someone believes that ordinary painting of pipes with their own hands without preparation can protect the material, then he is deeply mistaken. The painting process consists of several stages, and the first of which is the removal of rust:
- it is easily removed from the surface of the pipes using an emery sheet or rust transducer,
- degreasing with solvent or gasoline,
- all surface errors are processed by puttying on metal,
- after drying, stripping is carried out with a fine sandpaper to give an even layer,
- primer treatment is carried out.
Painting is possible only after the primer has completely dried. And it is possible that this procedure will have to be performed more than once.
It would be useful to say that if welding was done on the pipes with your own hands, for example, providing supports with overlays for fastening the casing, then before all the above manipulations, the welds are cleaned.
Another important point is the installation of plugs on the supports. This is necessary to protect the inside from moisture. But before, many to give greater stability to the pillars fill their voids with concrete.
Metal pipes in brick supports

Layout of a brick pillar with a profile pipe inside
To equip the fence with brick supporting elements, profile pipes of square or round section are also used. Their presence is necessary in the case of providing supports with wiring, the possibility of welding embedded elements, to make the structure with brick pillars of stability.
Do-it-yourself construction of a fence with brick pillars is carried out in most cases on a strip-pillar foundation.
To begin with, a trench is excavated along the perimeter of the fence. The bottom of the trench is equipped with a sand cushion, and in places where the supports will be installed, dig holes for pipes.
The deepening of the profile elements of the fence with brick pillars is carried out almost in the same way as with the full concreting of stand-alone pipes. The only exception is a bunch of metal elements with reinforcement of the foundation.
This is done in two ways. You can immediately weld metal racks to the bottom of the fencing pipes with brick pillars, which will hold them upright and only then reinforce the entire foundation. And you can, creating a reinforced belt in the foundation, provide holes for installing and fixing pipes.
In principle, the main subtleties of the choice of metal support elements of the fence are considered. Naturally, in the presence of finances, it is better to purchase new pipes equipped with overlays for securing the sections, plugs and lower stops, treated with antiseptic agents in a production environment. But with old, carefully prepared supports, your fence can serve not only your children, but also grandchildren.