Drywall is a universal material used in a variety of rooms - from the bedroom to the bathroom. Plasterboard sheets can be used both for decorative finishing, and for creating shelves or leveling walls. We tell about the features of GCR, as well as how to make a sliding wardrobe from this material with our own hands further.

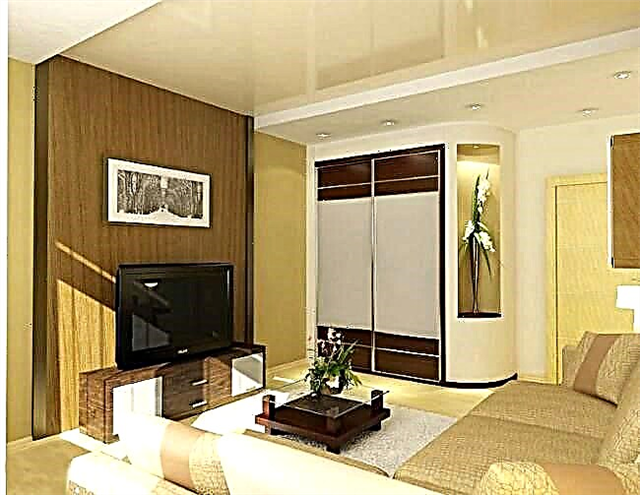
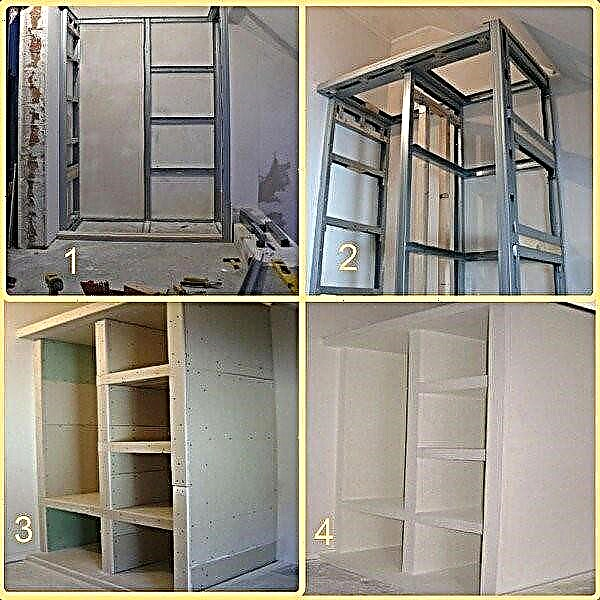
Drywall cabinet
Drywall Benefits
The advantages of using drywall include the following factors:
- gypsum plasterboards have a low cost, and you can find them in almost every hardware store, which makes them very affordable material,
- it is convenient and simple to work with drywall due to its flexibility - it easily lends itself to the tool of the master and is able to take a variety of forms. That is why it is often used to create decorative elements (cascades, arches, and so on),

Drywall does not cause difficulties when drilling or cutting

Advantages and disadvantages of plasterboard furniture
The main advantage of GKL cabinets is their relative cheapness - we have already mentioned. However, the advantages are not limited to it.
- Drywall cabinet can be made of any size and configuration. Given the eternal lack of space in our apartments, this is a good reason to think about GKL furniture.
- The built-in drywall cabinet will perfectly fulfill the task of zoning the room. You can even make a shelving partition in the middle of the room, dividing it into two parts. You can’t say the same about wooden furniture: the reverse side of it is usually fragile, unattractive and unsuitable for design purposes.
- GKL furniture is durable and can withstand significant weight.
There are no problems with the selection of the missing element of the situation, so that it is combined with existing furniture. Drywall cabinets fit easily into the overall interior: they can be finished to match the atmosphere, or you can "merge" with the walls and they will not violate the design of the room.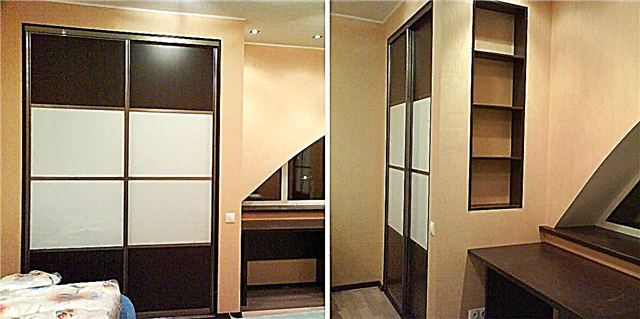

However, some restrictions may not appeal to potential users.
- GKL cabinet can only be built-in, that is, stationary. It cannot be rotated or moved to another place if after some time it seems more suitable. Lovers of permutations will obviously not like this.
- Despite their durability, drywall cabinets are not designed to store tools or sharp objects. They can withstand their weight, but can be damaged when placed if the wall is accidentally touched by a sharp edge.
- It is undesirable to hang doors on hinges on a built-in drywall cabinet. The load on the rack profile may be higher than the calculated one. In addition, the constant opening and closing of the door gradually bends the vertical element. Therefore, sliding wardrobes are more often made from GKL. If you certainly need classic doors, the frame will need additional reinforcement, for example, with wooden blocks embedded in racks, or with a double profile.
If you are not confused by the immobility of future furniture, and you are not going to keep sharp objects in it, you can proceed with creating your own built-in wardrobe from plasterboard with your own hands.
Sketch and Layout
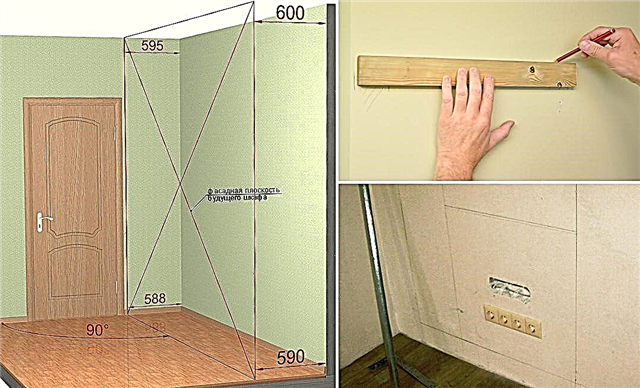
First of all, we determine where the structure will be located, what dimensions it will be, how many shelves are supposed to be made, what are the sizes of the longest clothes - this must be taken into account in order to correctly place the barbell under a coat, jacket and dress.

- A spotted place is measured at all corners of the future drywall wardrobe. This is necessary for size comparison: in rare apartments, all walls have the same height.
- A drawing is drawn indicating all sizes - this is necessary to calculate the amount of materials.
- After checking all the measurements, making sure that you drew what you intended, all the contours are transferred to the surface (walls, floor, ceiling). Before this, they must be cleaned, if necessary, degreased, and the old coating, which does not hold well, must be removed. Particular attention is paid to the floor: it may be necessary to strengthen and restore the surface yourself before making a built-in closet on it. The markings are drawn under the ruler and square in strict accordance with the sketch.


Before purchasing all the necessary materials for the wardrobe, you need to decide what you will make the frame from.
Wooden slats can withstand a significantly greater load and self-tapping screws fix the gypsum board more reliably, but they are susceptible to dimensional fluctuations from changes in temperature / humidity, decay and other damage.
It is easier to work with a metal profile, it provides maximum structural evenness and in all conditions maintains stability. Usually, under the built-in cabinet from drywall, a galvanized frame is mounted with their own hands.
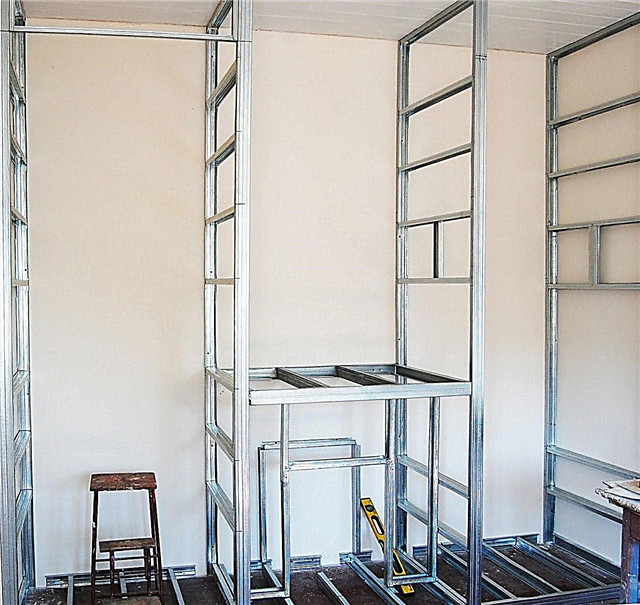
Creating the foundation for a built-in wardrobe
In any GKL construction, the main thing is the crate, and the cabinet is no exception. Its reliability and geometry directly depend on the relevant characteristics of your wardrobe. Therefore, when installing the frame, literally every element of it is verified by the building level and is attached with the right pitch.

- First of all, profiles adjacent to the surfaces are laid. The distance between them is maintained at 40 cm. A damper tape is laid under each element, designed to damp out acoustic waves - without it, the cabinet will turn out to be echoing. The tape has an adhesive layer, so you can stick it first, and then fasten the profile on top. When attaching the cabinet to a wall, ceiling and floor, level checking is especially important. Otherwise, the whole structure will come out crooked and will stagger.
- The next step is the installation of external vertical racks.
- Next, horizontal profiles for drywall are attached. The correct direction of their installation is from top to bottom. In the area of the shelves, the lintels should be as strong as possible, because you cannot firmly know what will be put on the shelves in the future. To form the back wall of the cabinet depends on the state of the wall of fit. If you have recently made repairs and the stove has a decent look, you can not sheathe it with drywall. In this case, the crossbars will be redundant, they are mounted only where the shelves will rest on them.

When the entire frame of the built-in cabinet made of drywall is created, you can proceed to its casing.
The final stage of installation work
Lining with GKL plates is carried out in the traditional way: the sheets are cut and fixed on the profile with self-tapping screws. Next, proceed as follows:
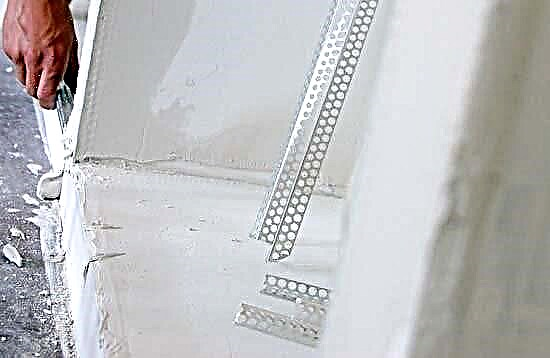
- Seams and internal corners are glued with a serpentine and sealed with a starting putty.
- The outer corners of the sliding wardrobe without fail are strengthened by a metal perforated corner, put on the same putty. Reinforcement is necessary, because in any case, someone hooks.

- The cabinet is primed both from the outside and from the inside, including the shelves, if you also make them from GKL.
- Finishing is puttying the walls of the wardrobe.
- Doors are measured. Previously, this step is impractical to make: the opening during installation and decoration may slightly change in size. At the same stage, the dimensions of the boxes are calculated, if they are provided for by a sketch.

Our advice: do not try to make doors or drawers yourself, unless you are a professional furniture maker - just spend time and materials, and in the end you will be left with an unsatisfactory result. In the end, you have already saved on the box of the built-in wardrobe from plasterboard by making it yourself.
- When the door leaves are delivered, the lower and upper guides that come with them are mounted.
- Doors are put in place, the facade is installed first, which will be closer to the rear wall.
- A stop located in the upper rail is mounted.
After you have finished making the built-in closet with your own hands, it remains only to draw up its outer surface - for example, to paste a film under a tree. And what kind of finish do you propose?
Disadvantages of Drywall
Despite its versatility, drywall (like any other material) has its drawbacks, which are important to consider before proceeding with the repair. The disadvantages of drywall sheets include:
- fragility. The flip side of ductility is the insufficient strength of such a material. However, this quality of GCR is relative - it all depends on what weight loads the structure will experience during operation. When installing the wardrobe, it is recommended to cover the walls with several layers of drywall,

Drywall susceptible to cracking when handled carelessly

Drywall walls are not able to drown out the sound
Varieties of drywall sheets
Each room requires its own wardrobes - a bedroom, kitchen or bathroom have their own "microclimate" features, which should be taken into account when creating or buying furniture.
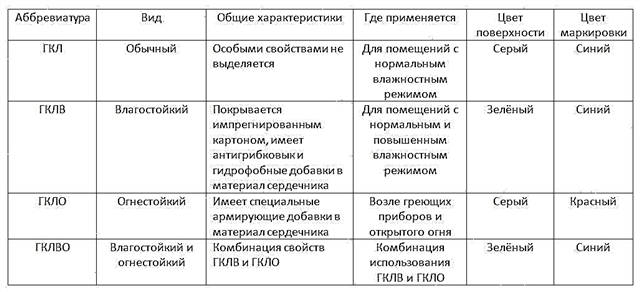
Table 1. Types of drywall sheets
| A type | Description |
|---|---|
| When making a cabinet for rooms with a stable microclimate (such rooms include bedrooms, living rooms or corridors), it is recommended to buy classic gray drywall sheets. They do not deform under the influence of the environment and will retain their proper appearance for a long time. | |
|
| When installing the cabinet for rooms with high air humidity (namely, exceeding the mark of 70%), you should pay attention to the moisture-resistant drywall sheets, which are mentioned in the chapter about the advantages |
|
| In rooms where the risk of fire of furniture items is increased (in particular, in the kitchen), experts recommend choosing fire-resistant plasterboard sheets for cabinets (they are marked with special red markings during production) |


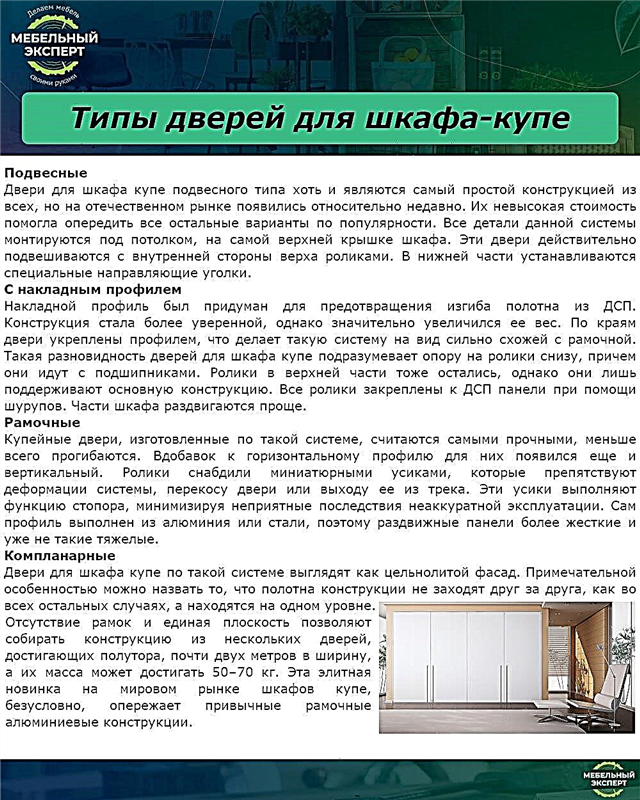
What are drywall cabinets?
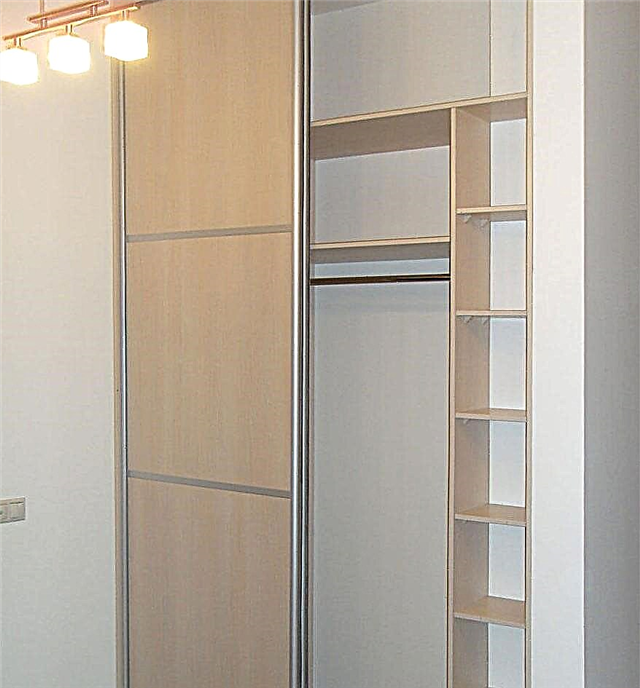
As already mentioned, the main significant limitation in the application of drywall is weight limitation. Gypsum plasterboard is able to hold weight up to twenty kilograms - large loads can threaten the collapse of the structure. Therefore, in most cases, builders prefer to place drywall cabinets in niches that give the cabinet great elegance and allow you not to occupy excess territory.

Drywall cabinets are convenient for storing clothes and other light things
In the absence of a niche, it is important to ensure that the cabinet has a support in the form of a wall or corner. Of course, and a separate design in many cases can stand for many years, however, the load-bearing wall helps to increase the reliability of the drywall cabinet. For example, studio apartments, where drywall cabinets are a kind of partitions that separate neighboring areas, they rely on bar counters.

Drywall cabinet in the toilet
Drywall cabinets in the bathroom or toilet also look great, as these rooms often involve niches. In addition, GKL toilet lockers rarely involve the storage of heavy items.
Tools and materials
Such a cabinet is simply necessary if the room has an empty space against the wall. Due to the durable frame of medium thickness, the cabinet walls do not take up much space. The choice of compartment doors is not accidental - such a move will save space in the room for placing other furniture.
It is very convenient to make the cabinet frame at the time of repairing the walls and ceiling, when covering them with sheets of drywall.
Materials that will be required for the manufacture of the coupe:
- sheets hl,
- metal profiles such as UD and CD, as well as wall fasteners and connectors that go to them,
- furniture fittings,
- protective corners,
- hard putty and primer
- paper tape or mesh for reinforcing seams,
- metal screws, dowels,
- internal filling of furniture,
- door facades and sliding system,
- decor or decoration for cabinet walls.
Of the tools, a building level, a screwdriver, a jigsaw, a puncher, a sharp construction knife with interchangeable blades are useful. With the help of the latter, it is necessary to smoothly cut pieces of material, so it is worth taking care of the replacement parts in advance.


Surface preparation and marking
The first thing to do is decide what the finished design will look like. For this, you can use various computer programs if you have the skill to work with them. You can also manually draw a sketch of the cabinet on sheet A4, observing the desired scale.
Thinking over the design of the product, pay attention to the internal space: the most optimal depth is 60 cm. The height of the product will depend on the height of the ceilings, and the width - on the allowable free space near the wall. Having decided on the sketch, you should go to the marking of the wall for the wardrobe from plasterboard:
- the selected place must be carefully measured,
- after that, a drawing is made indicating the required amount of drywall,
- the wall should be perfectly clean: if it was previously covered with an old coating - it is removed in any way possible and sanded,
- the floor surface must also be prepared for the installation of a new cabinet,
- when the preparatory procedures are completed, it is necessary to draw a cabinet on the wall and floor. To do this, it is better to use a ruler, a square and a building level.
After that, you can go to the hardware store for materials. Decide in advance on the frame - what it will be made of. Most masters advise working only with a metal frame - it is less susceptible to temperature extremes and reliable.


Frame assembly
When the materials are purchased, you can proceed to the assembly of the frame. Wall profiles are installed first, followed by ceiling profiles. If the cabinet has an internal backlight, it is worth bringing it in advance. Only after the lighting is brought inside, you can begin the installation of the frame. Consider the step-by-step process of assembling the basis for a sliding wardrobe.
| The foundation | After setting the wall level, it is necessary to fix the ceiling and wall profiles using self-tapping screws on concrete. |
| Installation of horizontal elements | In those places where shelves and other important load elements will be mounted, it is recommended to install horizontal profiles. To do this, the long elements are cut into necessary pieces with scissors for metal. The profiles are fastened to each other thanks to the “crab” type connectors. |
| Seal | At the time of fastening the profile to the wall, and on the other hand to the profile - it is worth putting a rubber seal. It will prevent loosening of the filling. |
| Racks | When the wall frame is ready, go to the protruding elements - facade racks. It is important to mount at the construction level so that the finished furniture does not have height differences. |
It is necessary to fasten the frame to the wall and floor every 30 cm, while the dowel can be screwed into concrete through the profile. This will provide additional structural strength.


Drywall
The technology of cladding the frame of a wardrobe of gypsum plasterboard with your own hands is quite simple in execution - it is identical to the process of cladding walls and ceiling. For work, 25 mm long metal screws are required. It is recommended to screw them at a distance of 20 cm from each other. If there is any doubt about the strength, this distance can be reduced.
Pay attention to some tips in the work on sheathing the frame with sheets of drywall:
- the head of the screw should be recessed in the surface of the sheets,
- sheets are recommended to be installed on the outside of the cabinet, if you do this on both sides - the internal space will be significantly reduced,
- the most common type of drywall with a thickness of 12.5 mm, it is also used for cabinets,
- before cutting the sheet, outline with a ruler and a pencil a cutting line, then draw it 2 times with a sharp knife - then lift and bend the segment, it will break into pieces,
- the remnants of paper on drywall should not be torn off by hand - it is better to do it with a knife,
- uneven edges after trimming can be processed with a planer.
Experienced craftsmen advise fixing gypsum plasterboard in the center of the vertical profile, so that in the future when finishing, the joints are not so noticeable.


Finish
Finishing work of the sliding wardrobe consists in applying a primer, a putty mixture, as well as sealing joints and visible defects. The whole process looks like this:
- trimming
- priming,
- joint sealing
- hard putty of a surface,
- priming,
- Finishing work.
The first thing to do is cut off all the joints with a sharp knife. To do this, walk the tool at all seams and cut off the edge. If this is not done, then all the defects will come out during operation. When the edges are cut, carefully inspect the surface: if the remains of gypsum stick out somewhere, they must be removed.
Next, they take the soil, dilute it with water and process all the cut edges and the entire surface of the drywall. This will provide better adhesion to the putty. The next step involves sealing the joints with putty and sickle. When the joints are sealed, the surface is putty. This is done with a spatula. After the mixture dries, it is recommended to sand the coating.
The final step will be priming over the putty to increase adhesion to the finishing materials. As a finish, you can choose paint, wallpaper to match the room.


Door installation
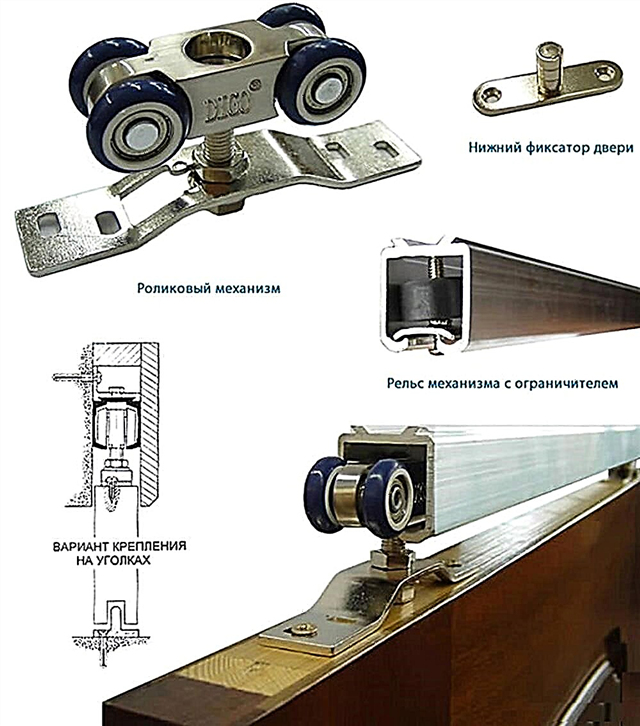
Much attention must be paid to the sliding system. You should not save on completing parts - a profile, rollers and guides, because the quality of furniture operation will depend on this.
When the niche for the coupe is ready, the system is installed. This is done as follows:
- on the lower part of the cabinet, most likely it is the floor, lower guides are attached. Previously, they can be cut by fitting to the width of the product,
- the upper rails are fixed to the furniture ceiling,
- the door with rollers is first inserted into the upper guide, and then installed on the lower rail,
- in the lower rail it is necessary to install special stoppers that block the loosening of the door.
When the facades are installed, they must be adjusted. It is important that the door does not sag and travel well through the system. If the door has a mirrored facade, check the quality of samples in the store in advance. Some factories violate manufacturing technology, as a result of which the mirror bends and the door starts to work poorly.


Creating a facade
The decorative finish of the cabinet is one of the most pleasant moments of the whole process. Here you can turn on your imagination and come up with how to make a cabinet beautiful and original. Consider several finishes for this product.
| Painting | It is considered the easiest option for finishing work. For this, acrylic or water based paint is used. After processing the background, you can apply a stencil and draw funny pictures. |
| Mirror surface | If there are no mirrors on the doors, they can be made on the sides of the cabinet facade. Making a full-length mirror will provide an opportunity to fully see your reflection. |
| Decorative plaster | If the rest of the room is stucco, do not deviate from the plan. |
| Wallpapering | Choose contrasting or plain wallpapers that are similar to the basic materials. |
| Imitation of natural stone | Masonry is the choice for antique interiors or loft style. |
| Decorative film | A simple method to diversify the cabinet surface is to stick a film. It is recommended to do this with a rubber spatula. |
Most types of finishing of cabinet facades are applied directly to the primer, so do not forget to always complete this step before decorating.


Hardware Mounting
Depending on what content will be organized inside the cabinet, the set of fittings will vary. In addition, shelves can also be made of drywall, but furniture panels made of chipboard will become the best option. Today, there are many companies where you can go for cutting large sheets of material, according to the specified sizes.
To assemble the internal space, you may need such accessories:
- ball guides for blocks of boxes,
- corners for fastening shelves,
- guides for drawers
- rod and flanges under it.
A photo of the finished drywall wardrobe can be seen in this material. It is worth noting that it is necessary to select the accessories strictly with the dimensions of the cabinet - if the depth of the product is 45 cm, then the guides should also have an appropriate depth.
Shelves can be fixed on special strong corners, and can be fixed on the metal profiles themselves. To do this, you must first prepare for them the base at the stage of assembly of the frame. Caps of self-tapping screws can be closed with special caps, to the color of the internal design.
By making your own wardrobe of gypsum plasterboard, you can significantly save money. The cost of GCR is small, and metal profiles are also available in price. The most expensive element is the sliding system, but it is considered appropriate in the case of a small room.
6 basic steps for making a drywall cabinet
Many believe that it is very difficult to make a drywall cabinet, in fact it is not. It is necessary to carry out 6 stages correctly and the cabinet of your own design will be ready. The steps are very simple:
- Make a drawing of the future cabinet.
- Prepare the necessary tools.
- Prepare the necessary fasteners, screws, dowels and other accessories that may be required when assembling the cabinet.
- Assemble the cabinet.
These are the main stages in preparing for work on the design. It is also necessary to decide which cabinet you will have: regular or corner.
In the premises there are no perfectly even floors, walls and corners, therefore, before drawing up the drawing, it is necessary to carefully measure all the defects and indicate them during the drawing so that inaccuracies do not arise when cutting the material.
Stage 1: drawing up a drawing
Before proceeding to the drawing, it is necessary to determine where the drywall cabinet will be located: whether it is a corner or a niche, or it will be located along the wall. How many shelves the cabinet will have, too, must be taken into account in advance, and you also need to immediately choose a place for the rods on which the hangers will be located, and how many there will be. Only then can we proceed to the drawing.
This should look like a drawing of a built-in ordinary cabinet, but this is an approximate option. Dimensions and niches for shelves may be different, it all depends on preferences.

A variant of the corner cabinet will look like this:

Stage 2: preparing the inventory
To make a wardrobe of drywall you will need the following tools:
- Hammer drill.
- Screwdriver.
- Scissors for metal.
- Level and plumb to control the horizontal and vertical structure.
- Chalk or pencil, tape measure and ruler (markup is applied with their help).
- Drywall cutting knife.
- Brush
Materials such as:
- Guiding and rack-mount profiles for hl.
- Drywall.
- Plastic dowels and screws.
- Squirt and damper tapes.
- Putty and paint.
At this stage, it is worth immediately deciding which doors the cabinet will have: hinged or sliding. If swinging, then they need to purchase accessories immediately. And if it’s sliding, then it’s more advisable to buy a finished system with doors, since it is very difficult to assemble such a unit yourself, especially for beginners and you can waste a lot of material and time in vain.
Stage 3: assemble the frame
At this stage, we begin to assemble the frame for the dressing room from drywall. Using a ruler and a pencil, we make markings on the walls:
It is also necessary to measure the slope of the floor and if there is a need to fill the leveling screed:

We cut profiles into segments of the desired length.

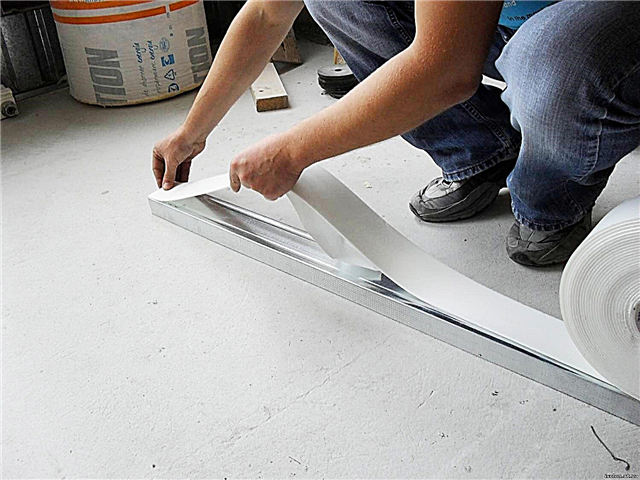
On the back side of the profiles that will be attached to the wall, glue the damper tape.

Then we install the guide profiles, which should be connected to the wall and floor. If you plan to make a dressing room of gypsum cardboard with your own hands to the ceiling in order to use the entire space, then the profiles should be attached to the ceiling. To attach the profile to the wall, you must attach it to the marking line. Next, we drill a hole in it with a screwdriver so that a dot remains on the wall. At this point, drill a wall with a perforator and insert it into the resulting dowel holes. After that, we apply the profile and fasten it into the prepared holes using self-tapping screws.

In screwed profiles, in accordance with the drawing, insert rack-mount and screw them with screws.

Next, we assemble the frame completely, not forgetting to check the evenness with the help of a plumb line and spirit level.
Stage 4: plasterboard cladding
Now the frame made must be sheathed with plasterboard. This will require drywall sheets, a pencil and a ruler. With their help, we place on the sheet the necessary dimensions, which are indicated on the drawing. Cutting the sheet is very easy. It is enough to draw a knife along the marked line and break it off along the notch line, we also act with all the sheets.

We fasten the sheets to the structure with self-tapping screws.

We do the same with all sheets, sheathing the structure completely.
At this stage, the assembly of the cabinet is completed, then go to the finishing materials.
Stage 5: cabinet finish
The existing gaps must be sealed with a ribbon - serpentine, so that in the future they do not appear from under the decorative layer.

To strengthen the corners of the structure, it is necessary to fix the metal perforated corners with putty.
After that, we cover the entire cabinet with a thin layer of putty.

After the putty dries, you can paint the dressing room in any color that is most suitable for the interior.
Final step: door installation
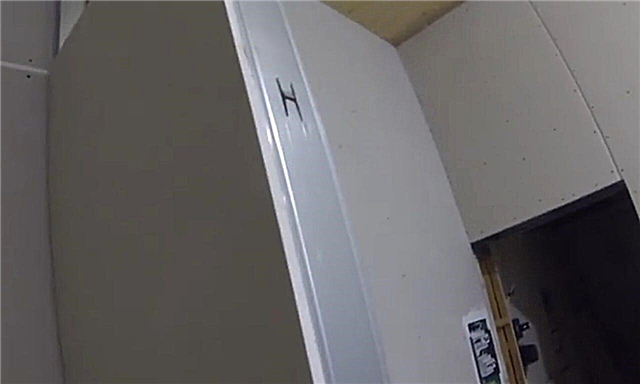
The dressing room is ready, it remains only to install the doors. If you decide to install swing doors, then for this it is necessary to fix the hinges with self-tapping screws. A mechanism is attached to the door itself, which must be connected to the hinges. Doors are adjusted after installation.
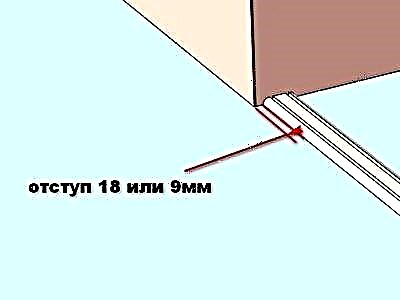
So that the doors do not sag over time and do not "loose", it is necessary to measure at least 11 cm from the upper and lower inner corners.
If the doors are sliding, then, as mentioned above, it is necessary to take the finished structure and just install it in the cabinet. For this, it is necessary to screw the upper rail first with screws.
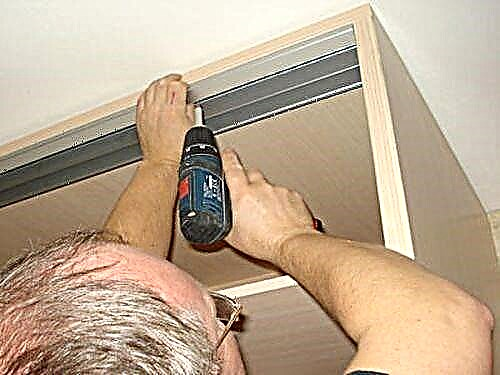
We proceed to the installation of doors. It is necessary to start from the back door, then we install the front door into the grooves and only then we begin to adjust it with the hex key.

The wardrobe is ready, it remains only to install boxes, shelves and other fillers at your discretion.
Do-it-yourself drywall wardrobe
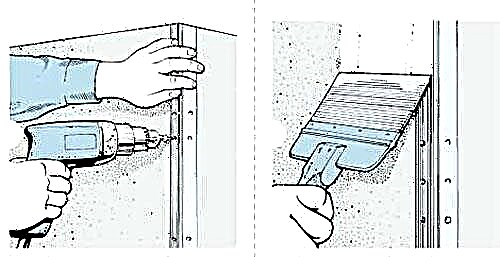
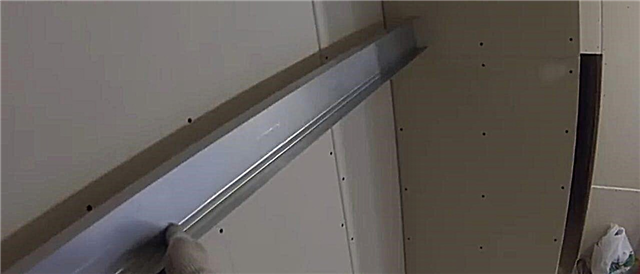
Step 1. First of all, a box for lighting is manufactured and the installation of a guide ceiling profile is carried out. On the wall of drywall, screw the profile in places where the metal profile passes in increments of forty centimeters. To fix the profiles, you can also use special dowels for drywall.

Screwing a profile to a drywall wall
Step 2 To a wall not made of drywall, profiles are fixed with nylon dowels. For convenience, drill holes first, then mark them with a pencil.

Fastening profiles with nylon dowels
Cabinet drawing
Creating furniture begins with its drawing. A detailed diagram of the installation and arrangement of the elements of the chiffonier will help to avoid errors during its assembly. You need to determine the location of the future structure: in the hallway, bedroom, as well as in other rooms, you must consider the distance from the windows to the door, the height of the ceiling.

From the profiles and cardboard form a body. Design the future filling and make a list of accessories for this. The sliding door system is created from traditional materials, and will be independent of the design of the box.
Having determined the dimensions of the built-in cabinet, transfer them to the paper. Draw the position of the shelves and partitions. Make the calculation of the required amount of materials, and prepare the tool.
Tools
To make a cabinet body from gypsum plasterboard, you will need the same tool as for ordinary work with drywall:
- metal ruler and tape measure,
- level and plumb
- screwdriver,
- hammer drill
- scissors for metal,
- hammer,
- end plane
- marker or pencil
- construction knife
- hacksaw,
- jigsaw
- brushes
- spatulas.

As you can see from the list, the tools are standard, quite common in every home.
Materials
Based on the drawings, make a specification of the materials necessary for mounting the housing and filling the wardrobe:
- drywall
- metal profile
- screws and dowels,
- damping tape
- polymer net (serpyanka),
- hard putty (starting and finishing composition) and primer,
- water-based paint,
- vinyl wallpapers.
Depending on your taste preferences, you may need one thing: either wallpaper or paint.
Drywall
The choice of casing material should be treated with extreme caution. The design of the shelves takes on a vertical load from the things laid on them, sometimes quite weighty. Therefore, it is better to take GCR with a thickness of at least 12.5 mm.
For sheathing a metal skeleton, it is sufficient to use sheets with a thickness of 8 mm. We advise you to purchase sheets of drywall of the same cross section: this way you will have no difficulty in plating vertical and horizontal metal surfaces. It will always be possible to cut an extra piece from the entire supply of cardboard. Therefore, choose all cardboard according to the maximum size of the end - 12.5 mm.
If you decide to make a built-in, freestanding cabinet in the bathroom or in the kitchen, then use moisture-proof drywall. This also applies to all damp areas.
In any room, furniture located near a frequently opened window is also made of moisture-proof material.
Speaking of dimensions, distribution networks sell plasterboard sheets in the following sizes:
- from 2 m to 4 m long,
- from 1.2 m to 3 m wide,
- thickness from 6.5 mm to 24 mm.
Based on the size of the gypsum board chosen by you, we make a cutting drawing of all the elements of the lining of the wardrobe of the chiffonier. It will help to avoid shortage of material or its excess. Lay an additional 5% of the total cardboard area for marriage or accidental damage to parts during their manufacture.
Metal profile
The galvanized steel profile for drywall is presented in several forms. These are UD, CD, CW and UW rolling products intended for the formation of partitions, suspended ceilings and wall claddings indoors. Some of them are needed for the installation of supporting elements, from other long-lengths the connecting parts of the skeleton are made, which ensure rigidity of the whole structure.
From the entire range we will make the choice of profiles that you will need for the installation of a wardrobe from GKL.
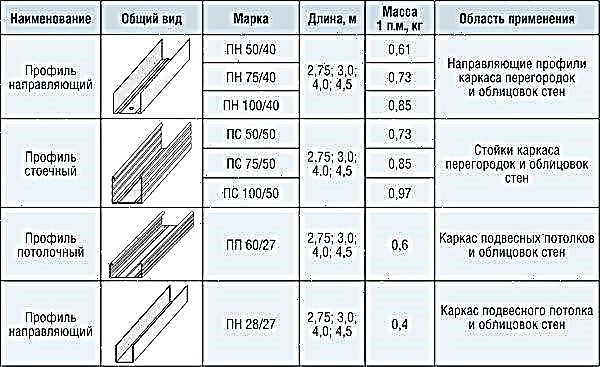
UW (PN and PNP)
Guide profiles limit the horizontal border at the top and bottom of the box. UW slats are fixed on the floor and ceiling with dowels.If during installation in a niche of an integrated structure the height is less than the distance from the floor to the ceiling, the upper belt of the box is attached to the walls.
A similar method is used if it is necessary to fill the entire width of the wall with a structure. The profile is mounted vertically facing the shelves inside the room.
Steel rails realize the following sizes:
- 3 m long
- shelf height - 40 mm,
- the width of the base is 50, 65, 75 and 100 mm.
For the cabinet, we select length profiles with a wall width of 65 mm from the profiles. If the furniture will be small in size, then rail profiles with a wall of 50 mm can be used as guide profiles.
CW (PS)
CW racks form vertical supporting metal elements. With their ends, they enter the UW guide rails. The rack profile transfers all the load from the filled shelves to the base of the room. Dimensions of steel products:
- length - 3, 3.5, 4 and 6 m,
- shelf - 50 mm,
- wall - 50, 65 and 75 mm.
In our case, we use a profile with a wall of 65 mm. The edges of the sides are slightly curved, the wall has longitudinal grooves so that the length meter has increased rigidity and increased bearing capacity.
As the connecting elements of the frame and to create supports for the shelves we use UD strips. Products are made with a length of 3 m, a shelf height of 27 mm and a wall of 60 mm.
Perforated corner
The profile performs the function of protecting the external and internal corners of the drywall. It is sold 3 meters long, with sides of the shelves 25 and 31 mm. Perforation makes the corner easy and allows putty to be most tightly fixed to cardboard.

Screws and dowels
Using self-tapping screws for gypsum plasterboard and fixing elements of a metal profile, you will need screws with a length of 10 and 30 mm. Screws with a screwdriver connect the steel parts of the supporting structure to each other. Long fasteners are used to fix GKL sheets to metal.
Use nail dowels to secure the supporting structure to the surrounding concrete or brick fences. Drill the metal and the wall with a perforator, then hammer a dowel consisting of a screw inserted into the PVC tip. Usually, fasteners with a length of 30–40 mm are used.
Polymer mesh
Serpyanka is a polymer network. Use it to strengthen the joints between the sheets of drywall. Fasten the tape to the cardboard with the starting filler. The width of the strips is from 50 to 100 mm.
Putty and primer
There are putty for start and finish coatings GKL. The building materials market offers dry mixes and ready-made putty. The advantage of dry formulations is that you have the opportunity to always prepare the amount of putty you need at this stage of the work. The powder must be diluted with warm water and mix thoroughly.
With the starting mixture, you will cover the joints of the drywall dock, close the self-tapping hats and fix the protective corners on the outer and inner sides of the frame lining.
When the starting coating has dried, apply a primer to the entire cardboard with a brush. The mixture is sold in glass or plastic containers. The tool will strengthen the paper base and the surface layer of gypsum.
Using a spatula, finish all GKL surfaces with a finishing composition. Such a coating is also applied with a spray gun, which forms a high-quality smooth surface of the cardboard.
Water-based paint
White paint is mixed with pigment of the desired color or used without dyes. It all depends on your taste. You can paint the interior of the cabinet in the color of valuable wood. In the store, paint is sold ready-made in plastic containers (from 2 to 10 liters). The thickened product is easily diluted with clean water to the desired consistency.
Step-by-step instructions for assembling the box and filling yourself
| Step No. | Photo | Process description |
| 1 |  | We determine the location of the wardrobe. Furniture should not interfere with the passage of people and prevent the full opening of doors and windows. The corner cabinet is conveniently located opposite the entrance to the room. |
| 2 |  | On the floor, ceiling and on the walls we mark the dimensions of the box. For this we use a pencil, marker, tape measure, metal ruler and level. |
| 3 |  | According to the drawings and specifications, we cut the steel profile into the desired segments with scissors for metal, a hacksaw or a jigsaw. |
| 4 |  | In accordance with the marking, dowels, we fix UW profiles on the floor and ceiling. |
| 5 |  | After installing the racks, we fasten them with screws to the upper and lower rails. Now you need to attach the vertical elements to the walls with dowels through perforated strips of suspensions with a step of 40-50 cm. |
| 6 |  | We install the transverse rails of the frame. They are inserted into racks and fastened with screws using a screwdriver. The crossbars are fixed so that the openings between the shelves are at least 300 mm high. This is the optimal size recommended by furniture assembly specialists. You can maintain a different distance between the shelves. |
| 7 | In the compartment for clothes, it is necessary to fix the bar on the metal cross members of the box on which the trempels will be hung. | |
| 8 |  | To divide the contents of the cabinet into compartments for shelves and outerwear, install a partition. Collect it in the same way as the side walls of the box. |
| 9 |  | You can also assemble the metal frame of the partition cabinet. Often they make open a makeshift wall for delimiting (zoning) a nursery, living room or room for another purpose. In this case, the design can be used as an open bookcase. A wall made of drywall is often placed in the corridor to store everything that interferes in residential premises. |
| 10 |  | If the box does not reach the ceiling, then you can make a straight arch, which fill the ceiling space. Make an arch from a metal frame sheathed with sheets of drywall. |
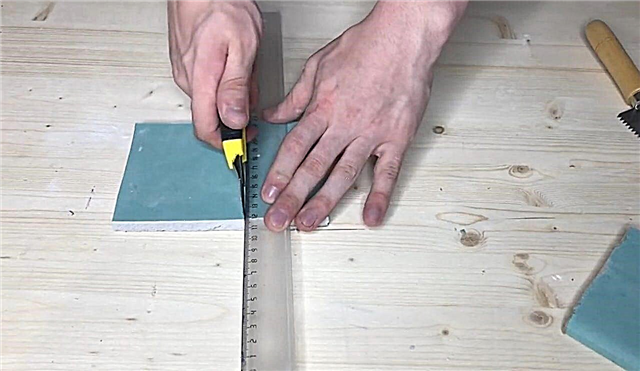
| 11 |  | Mark the drywall sheets using a tape measure and a metal ruler. Mark lines with a pencil or marker. |
| 12 |  | Drywall cutting can be done in two ways. In the first embodiment, cardboard is cut with a jigsaw. But this is not very convenient to do without a large workbench or table. You can cut the material directly on the floor. Place any flat length meter (timber or board) under the cut line. When applying the ruler, cut the marking shallow with a construction knife (3-4 mm). Then, pressing on one of the sides of the sheet with your hands, achieve an even break in the cardboard. If there is no experience in this matter, then it is better to practice unnecessary scraps of material. |
| 13 | The ends of the facing elements are treated with a miter plane for gypsum plaster. This work can be done with a sanding mesh fixed with clamps on a special bar. | |
| 14 |  | First, fasten the shelves to the cabinet frame with self-tapping screws. Then sheathe the vertical surface of the box. |
| 15 |  | When installing shelves with a width of more than 50 cm, secure the additional cross beams from the CD profile. Cut the ends of the crossbars with scissors, separating the shelves from the wall at a distance of 60 mm. Bend the ends of the shelves at a right angle. Then fix them with screws on the side surface of the rack, and attach the end of the wall with a screw to the base of the rack profile. |
| 16 |  | So that the thickening of the side surface of the rack does not interfere with the lining, the place of contact of the drywall must be sharpened with a planer or rasp. |
| 17 |  | Saturate all surfaces with a primer using a brush. |
| 18 | 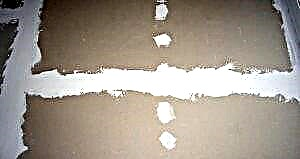 | Starting putty cover the joints, lining seams and close the hats of the screws. Fasten the screws so that their tops are recessed in drywall. |
| 19 |  | Glue all treated areas with a serpentine. Treat the tapes with the starting mixture. |
| 20 |  | Set the angle profile, coat it with a putty knife. |
| 21 |  | After a day, treat the drywall with the finishing composition. Flaws to clean a grid or "zero" emery cloth. |
| 22 |  | Brush the whole box again with a primer. |
| 23 | 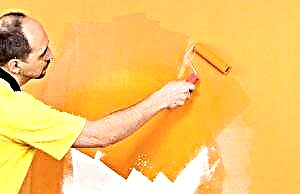 | At your request, the entire structure can be painted with a water-based composition or glued with vinyl wallpaper. |
| 24 | 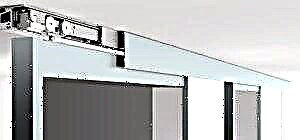 | At the end of the work, proceed with the installation of the sliding doors. To form a frame, use boards or beams with a width equal to the cross section of the metal guide rails. |
| 25 |  | Install the wooden frame almost flush with the uprights of the box. A clearance of 1-2 mm must be maintained. This must be done so that the dynamic loads from the movement of door leafs are not transmitted to drywall. Otherwise, the cladding material may crack and subsequently collapse. |
| 26 |  | If the floor and ceiling have an ideal horizontal surface, then you can do with the installation of only racks of timber. Attach the guide rails of the sliding system with dowels directly to the horizontal fences of the room. |
| 27 |  | The gap between the door frame and the compartment must be filled with damping tape. |
| 28 |  | It is desirable to fix swing doors to the cases of small cabinets. If you still decide to install such doors on a drywall structure to the ceiling, then you can not do without installing a wooden frame. |
It will be useful to learn how to calculate and install a sliding system for a sliding wardrobe (link XXX).
GKL TV cabinet
The principle of assembly of a TV stand made of drywall with a steel profile frame remains the same. It should be noted that the pedestal must be made mobile. To do this, we assemble the floor frame from the guide profile. Install furniture legs in the corners. They can be monolithic or equipped with wheels.
Then assemble the entire metal frame. On the upper frame, fix the plasterboard countertop. It can be made semicircular or rectangular.
After puttying and painting, fasten the doors. Mounted planes can be made of other materials (chipboard or MDF).


It is easy to give a curbstone to an original design which will harmoniously fit into an interior of any room.
Features of the installation of lockers from GKL for kitchen and bathroom
In these rooms, due to high humidity and temperature changes, adverse conditions are created even for furniture made from gypsum concrete. It. If you decide to install such furniture, then it is better to place it away from the stove, refrigerator, sink, shower or bath.


Benefits of Making Drywall Furniture
Drywall furniture is not in vain very popular among the population. This phenomenon is facilitated by such positive qualities of the material in question:
- Easy installation of structural elements. You do not need a lot of experience in handling tools, furniture manufacturing is available to everyone who wants to assemble a wardrobe from GKL.
- If we compare the cost of manufacturing a MDF chiffonier and assembling furniture of similar dimensions from metal profiles and drywall, the savings can be up to 20% of the total costs.
- The ease of connection of steel elements, their cutting, cutting of cardboard sheets allows you to quickly make a cabinet of the required dimensions and with the desired content.
After reading the article, you should have no doubt that plasterboard can be effectively used for furniture. Despite the apparent fragility, from GKL in combination with a metal profile, fairly strong and reliable cabinets can be made.
Drill range prices
Step 3 Make the small lintels of the ceiling profile that you will need to secure the structure. The installation of the segments occurs in increments of 40 centimeters. To begin, fasten them only from the top.

Fixing the jumpers of the ceiling profile from above
Step 4 Check the alignment of the guide profiles using the level.

Verify Profiles with a Level
Step 5 After checking, fix the jumpers of the ceiling profile from below.

Fixing the jumpers of the ceiling profile from the bottom
Step 6 Set the profiles in a horizontal plane in increments of 40 centimeters. To begin with, fix horizontal profiles only against the wall, and then fix them near the vertical part so that it is plumb.

Fixing profiles in the horizontal plane
Step 7 Sew the metal frame of the box with drywall. Drywall is mounted on the bottom of the box. The side part should not be sewn up yet - it is sewn up later simultaneously with the partition.

Drywall framing
Step 8 Install the rack profile and fasten it in increments of thirty centimeters so that the partition turns out to be stronger (when using the cabinet, the doors will beat against it when opening).

Install Rack Profile
Step 9 Sew the cabinet partition from the inside with drywall in one layer (other layers are added later). As already mentioned, the partition will experience heavy loads when using the cabinet, therefore it must be made as rigid as possible. In this regard, on each side it is sheathed in two layers of drywall.
Drywall partition
Step 10 Attach drywall to the horizontal jumper on the inside. In the process of drilling the jumper make sure that it does not warp.

Attaching drywall to a horizontal jumper
Step 11 Proceed with the installation of the metal frame. The guide profile is mounted first.
Installation of metal rails
Step 12 Next, put the rack profile. It is advisable to install this profile in increments of 20 centimeters for greater shelf strength.

Mounting rack profile
Step 13 Sew the shelf on both sides with drywall. For convenience, the shelf is sutured with two pieces of drywall. These halves will dock in the place of the future partition.

Gypsum plasterboard wardrobe frame
Subsequently, the skeleton of the future cabinet is plastered and doors are installed on it. In this case, a protective profile is installed at all external corners.
You can read about what types of doors are suitable for drywall wardrobes below.
Types of doors for wardrobes
By the way! How to plan the space in the wardrobe can be found in a separate article on our portal.
Drywall Handling Errors
Even such simple material as drywall can behave unpredictably if you do not know a few basic rules for handling it. In this chapter, we will talk about the main mistakes made by both beginners and experienced masters and show you how to avoid them. The shortcomings when working with drywall include a few points:
- incorrect location of the screws,
- non-observance of the depth of screw tightening,
- ignoring the putty stage,
- improper drywall cutting,
- non-compliance with indentation,
- the use of low-quality or inappropriate profiles in this case,
- incorrect connection profiles.
Screwing screws too close to the edge
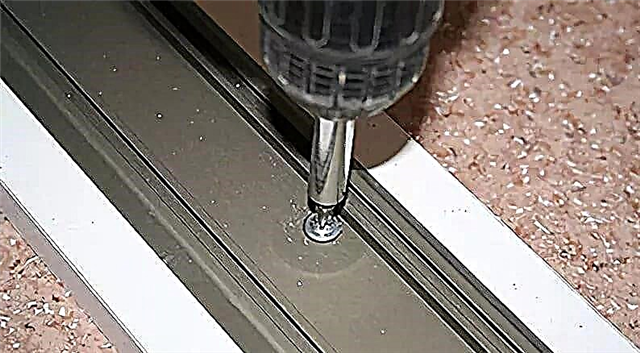
When installing drywall, profiles, sheets of material and self-tapping screws are used, which fasten these two elements. If you tighten the screws in the wrong place, the drywall due to its fragility runs the risk of starting to crumble, which puts a cross on the entire further structure. Correct installation involves the location of screws at a distance of 10-15 millimeters from the edge of the sheet.

Incorrectly screwed self-tapping screw destroys the GCR
Incorrect screwdriving depth
If the self-tapping screw is too deep, the cardboard layer can break, which will subsequently affect the quality of the structure, since the frame will not be rigid enough. The surface location of the self-tapping screws will affect primarily the putty moment, since the putty knife will cling to the protruding self-tapping screws.

A deep, as well as a superficial arrangement of self-tapping screws harms a design
A suitable depth for twisting the screws is one millimeter (we are talking about the distance from the sheet to the head of the screw). To facilitate the determination of the distance, it is recommended to use special nozzles with a limiter, forcing the screwdriver to stop at the right time, not allowing damage to the gypsum plaster.Such a nozzle can be easily purchased at any building materials store.
Ignoring the putty phase
For many inexperienced masters, the putty stage raises questions - what is the point of aligning the material that is even initially? However, this meaning is still present. There are three good reasons why masters do not neglect this step:
- the dryness of the drywall is deceptive. With suitable lighting, it is easy to see that the surface of such a sheet is strewn with microscopic grooves. In the event that you want to paint drywall immediately, the paint will lie sloppy on these furrows, which will be noticeable after it dries,
In the absence of putty on drywall, grooves may be noticeable

When skipping putty, hats of self-tapping screws can be seen
You can skip the puttying step if subsequently the material is hidden by wallpaper (preferably embossed), which will allow you to “retouch” all the shortcomings of the raw material.
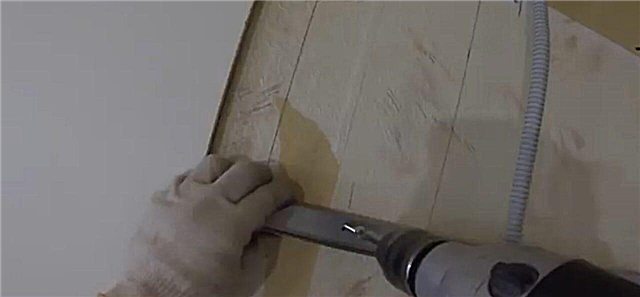
Incorrect drywall cutting
Despite the fact that drywall is a very flexible material that can be affected by any saw, there are a number of nuances to be aware of when cutting it. There are special files designed to work with drywall, but after them the edges of the gypsum board often remain uneven, which makes them untidy. When performing straight cuts, masters periodically turn to an ordinary clerical knife and a ruler.
Drywall cutting with a clerical knife
Indentation Failure
One of the common mistakes when handling a drywall sheet is to mount it close to the floor. During installation, it is important to leave gaps that perform two important functions:
- prevent moisture absorption by drywall. Of course, moisture absorption will take place in any case, however, the presence of a gap will minimize it,
- after installation, the drywall sheet gradually expands under the influence of the microclimate. If he does not have this opportunity due to a tight fit to the floor, then tubercles may begin to form on the material.

Example of drywall bumps for ceiling decoration
Full observance of the rules requires not just leaving a gap, but also sticking the damper tape, which will compensate for the expansion of the GCR and, moreover, reduce the vibration of the mechanical profile, which will increase the sound insulation.
Using substandard profiles
The main drawback when choosing profiles is the purchase of too thin (0.3 mm thick) specimens. The strength of these elements is largely reminiscent of foil - if desired, they can be easily bent manually.
Such profiles are absolutely not suitable for creating walls or installing wardrobes. The optimal strength of the profiles that can fix the drywall sheets starts from 0.6 millimeters. Thinner options are used only to form small boxes that do not involve load.

The thickness of the profile is of great importance for subsequent installation and determines its success or failure.
In addition to the thickness of the profile, it is also necessary to take into account its texture. Basically, in stores there are two options for profiles - smooth and embossed. Embossed profiles are great for beginners who tighten the screws with a screwdriver (by fixing the self-tapping screw in the recess). When working with a smooth profile, the self-tapping screw can slip, which sometimes leads to incorrect twisting, the danger of which we have already mentioned.
Incorrect connection profiles
This item includes several errors periodically observed even by experienced craftsmen. One of these errors is the connection of two profiles with each other using a press washer. It is believed that the use of such self-tapping screws allows reliable connection of profiles.

Joining profiles with a notch
Rowing prices
The main problem is the sticking out of caps on such washers, which subsequently does not allow to correctly lay a sheet of drywall - it simply does not fit to the profile. Accordingly, despite the strength of the frame, we do not end up with a reliable design due to staggering drywall sheets. In order to carry out the installation correctly, the best solution would be to use a notch.