Usually, at the final stage of the overhaul of the apartment, the inner surfaces of the balcony are sheathed with plastic panels. This allows you to make a balcony not only attractive, but also use it as a living room.
Among the many features of PVC panels, a simple advantage is considered a significant advantage. Small skills in construction are enough to make high-quality casing with the help of step-by-step instructions.
Benefits of PVC Panels
Specialists call building material from polyvinyl chloride (PVC) plastic.
By designation, there are two types of material on the market:
- Wall panels - differ in durability and small flexibility. Thanks to such qualities, they are not afraid of heavy loads, therefore they support the weight of a small cabinet or shelf,
- ceiling panels - have a low strength, as they must support only their own weight. Sold at a lower price than wall panels.
Depending on the size, plastic panels belong to one of the groups:
- plastic lining - width up to 10 cm, length 300 cm. The material is intended for any kind of decoration. It’s convenient that it is painted on both sides, but during installation a seam is formed,
 Plastic sheathed balcony
- sheet panels - width up to 203 cm, length 405 cm. The most popular material from the PVC family, which is attached with self-tapping screws or glue,

- sandwich panels - width up to 150 cm, length 300 cm. A multilayer material in which insulation is laid between two sheets of plastic.

PVC panels are popular among owners of balconies due to such features:
- during installation, special tools are not needed and large skills in construction are not required. The work is simplified due to the light weight of the panels. In addition, there is no need for quality surface preparation,
- communications are easily hidden under the paneling,
- thermal and sound insulation of the room is improved,
- simple replacement of damaged areas,
- easy care, wipe the surface with a damp cloth
- attractive appearance - more than 20 years,
- environmental safety is ensured by the absence of toxic components,
- a large selection of color and textured options to create a unique interior,
- affordable price.
Calculation of the number of panels
Before buying, the required number of panels is calculated, depending on the size of the balcony.
When calculating a number of features are taken into account:
- panels have different widths. With a complex wall configuration, narrow models (10 centimeters) are acquired, and medium-sized models (25 centimeters) are better suited for conventional wall and ceiling cladding,
- for a glazed and insulated balcony, panels of any width are suitable, and for an uninsulated balcony a narrow plastic is suitable, since it better withstands temperature fluctuations,
- panels are produced with a maximum length of 6 meters.
The best thing, for finishing a standard balcony, 2.5 meter panels are suitable.
The number of panels for the ceiling and walls is calculated differently:
- ceiling - the area is measured and divided by the width of the panel,
- walls - the perimeter of the balcony is measured and multiplied by the height of the ceiling. The resulting area is divided by the width of the panel. The area of the openings, as a rule, is not excluded from the calculations, since it is required to have a reserve in case of a mistake.
1. If in the calculations you get a fractional number of panels, then rounding to an integer is done upwards.
2. Before work, a stock of two panels is created.
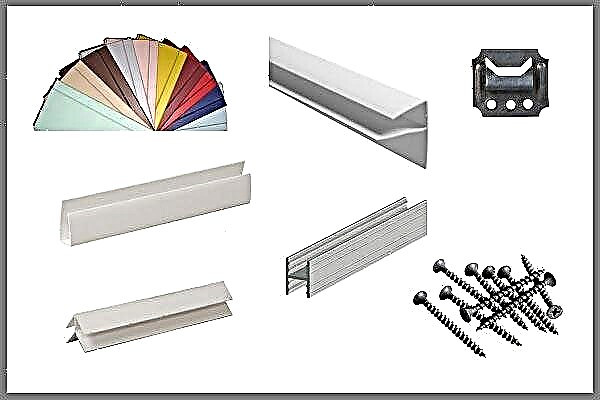
In addition to panels, when cladding, various finishing elements are installed.
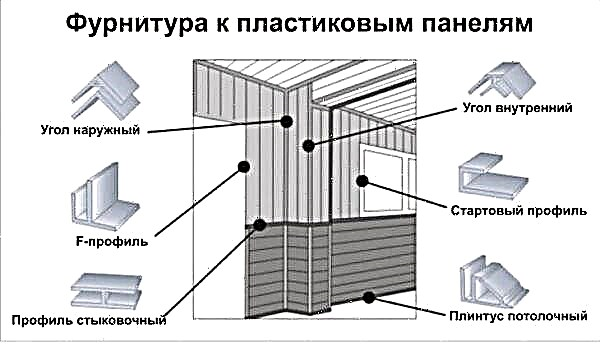
- Starting profile - with the form in the form of the letter "P". The fastening of the panels begins with the installation of such an element.
- Finishing profile - with the form in the form of the letter "F". Laying panels ends with such an element.
- Outside corner - used for wall cladding with a right outside corner.
- Internal corner - used for wall cladding with a right internal angle.
- Universal corner - used to close joints in corners. Usually has a decorative look.
- Connecting profile - with the form in the form of the letter "H". The element is used to build panels in length.
- Ceiling plinth - laid along the joints of ceiling and wall panels. As a rule, it is used together with connecting corners.
Selection of crate elements
For laying PVC panels, one of the methods is selected:
- frameless mount - An inexpensive way, but suitable only for very even walls with right angles. For fastening, various solvent-free adhesive compositions are used. Before laying the panels, the surface is cleaned and primed,


- frame mount - very even walls and corners are not required. Laying is done on the frame in the form of a lath, which is fixed perpendicular to the panels. With simple installation, crate elements are evenly distributed over the entire surface in increments of up to 500 mm. When combined laying, the elements of the crate are necessarily located at all joints of the panels.

The frameless method has a significant drawback that limits its use. With this fastening, you cannot change a damaged panel. In addition, in this case it is impossible to lay the insulation, which is necessary for covering the balcony.
In this regard, balconies are usually sheathed with PVC panels in a frame way. With this method, the crate is mounted from various materials:
- wooden slats - inexpensive and easily processed material. In the case of special impregnation, the material does not decay and does not burn. A significant drawback is the deformation during drying,
- metal profiles - have increased strength and durability. A significant drawback is the high price,
- plastic profiles - resistant to moisture. Significant disadvantages are the high cost and ability to withstand small loads. Most often, such profiles are used when covering the ceiling.
For the lining of balconies, wooden battens are mainly used. With good waterproofing of the balcony, they do not get wet, and therefore do not deform after drying.
For the battens you need slats with dimensions of 40X20 mm. Their number is calculated in the following way:
- lengths of each wall and distance to the ceiling are measured. The interval between the slats is selected up to 50 cm. After that, the distance to the ceiling is divided by 50 and multiplied by the length of all the walls. The resulting number is rounded,
- lengths of door and window openings are measured. The resulting lengths of the slats are rounded and added to the obtained length for the walls,
- In addition, two slats are mounted on each wall to the ceiling. Their total length is added to the value obtained earlier,
- 5% of the length, which will be in demand during trimming, is added to the resulting total length of the rails.
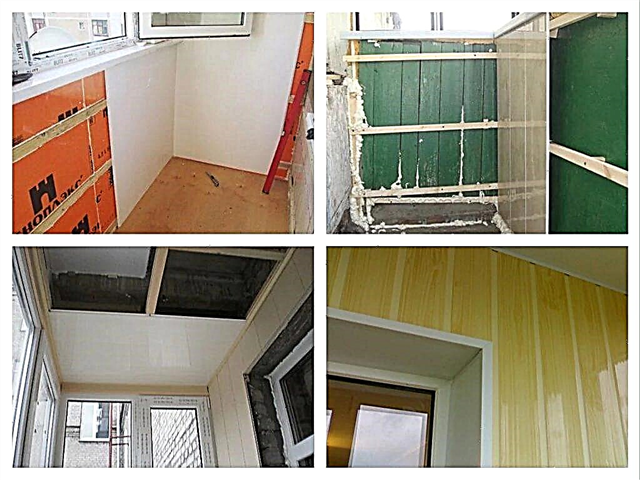
Preparatory Activities
A high level of coziness and comfort after lining with plastic panels can be achieved when the balcony is glazed, has good sealing and is insulated. There are such rules for preparing for skin.
- Plastic windows are installed for glazing the balcony. They are in demand because of high tightness, durability and low price.
- Before sheathing, foam or expanded polystyrene is prepared to warm the balcony.
- Sealing of cracks is carried out with mortar or polyurethane foam.
- Mold and fungus must be removed, and the affected area is treated with a special composition.
- If the main walls on the balcony are made of gratings, then they are dismantled, and the free space is covered up with brick or other materials.
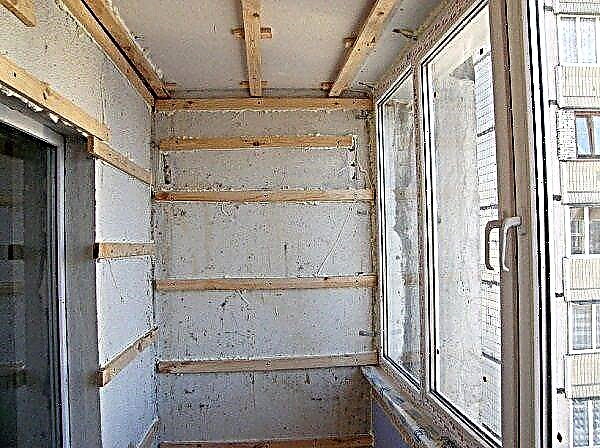
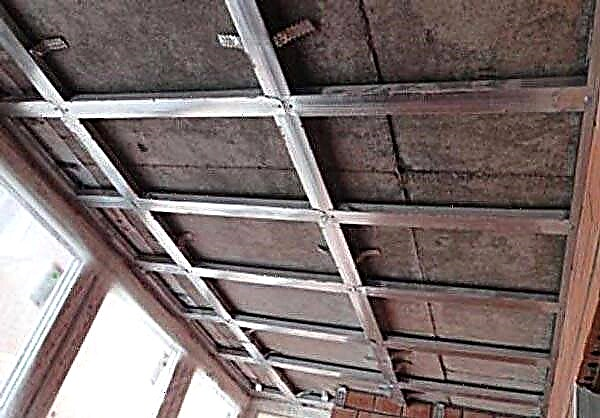
Installation of a wooden crate

The condition of the laid surface largely depends on the crate. Before installing it, the direction of laying the panels is selected. Without a doubt, horizontal panels visually increase the width of the balcony, but vertical panels increase its height.
The mounting feature of the crate is as follows: for horizontal panels, the strips are mounted vertically, and for vertical panels are mounted horizontally.
Experts believe that the most convenient installation is when the walls are sheathed vertically, and the ceiling across the balcony.

The wooden crate is mounted in the following order:
- marking the ceiling and walls
- the slats are cut to size and fixing holes are drilled into them,
- in terms of level, starting from the corners, the slats are mounted on the walls and on the ceiling in increments of 50 cm. The first rail is installed at a height of 30 mm from the floor. Be sure to need rails around the perimeter of the door and window openings. Fastening is recommended to be done with dowels,
- sometimes prepared insulation is placed inside the crate.

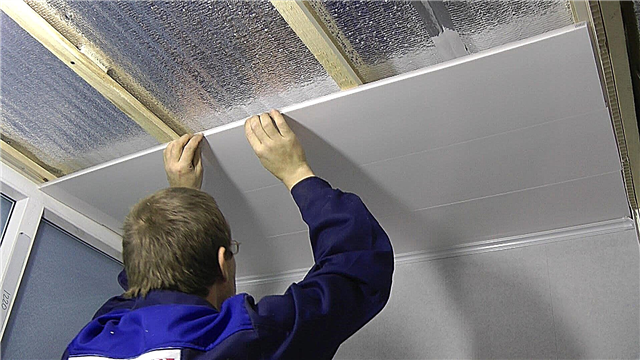
Panel Mounting
Plastic-paneled balcony looks attractive if respected general installation rules:
- panels are attached to the crate with small screws or brackets,

- each panel is firmly fixed in the groove of the previous panel until a distinctive click is heard,
- when the last panel does not fit, it is trimmed and then inserted into the finish profile.


Step-by-step covering of the balcony is as follows:
- the first is sheathed ceiling. Initially, a start profile is installed around the entire perimeter. In order not to skew the panels, the installation is adjustable in level,
- panels are inserted one into another and attached to the crate,


- the entire surface of the ceiling is sequentially sheathed,
- laying of wall panels starts from the corners. First of all, start and corner profiles are installed in the first corner,


- the launch pad is cut to size and inserted narrowly into the corner guides. There are special requirements for installing this panel. The perpendicular to the floor must be maintained, since any skew will spoil the entire look of the skin,


- the panels are cut to size and are joined with the start panel, and then, among themselves. In this way, the entire area of the walls is covered,
- the casing is completed by attaching a ceiling plinth. It closes the junction of the panels at the top. But the bottom of the panels is closed with a skirting board after laying the floor covering.


To make the sheathed surface look monolithic and have an even appearance, installation work is carried out carefully and without haste.
So, it is not difficult to make the skin of the balcony from plastic panels. It is no secret that any repairs in the apartment require financial costs. The repair cost will be significantly reduced if the balcony is finished with such material.
To consolidate the information, see our video tutorial:
Features
Simply put, this material is called plastic. For a loggia or balcony, such decoration can become a real decoration, and this is even more important if it is decided to increase the area of the room due to the balcony. Beautiful and high-quality finishing of the balcony with plastic is a very common phenomenon, and a number of factors contribute to this.
Material advantages
- Availability. First of all, finishing the balcony with plastic panels will be quite affordable for the average family.
- Ease of installation. The second factor, which is no less important, is the relatively affordable and uncomplicated installation of panels, which can be done independently. Moreover, when installing with your own hands, you will have the opportunity in the future to easily dismantle if necessary, or to perform fragmentary repairs of one of the coating areas.
- Durability. Plastic panels have a long durability; they can be guaranteed to be used for 25 or even 50 years. Plastic panels are environmentally neutral materials, they are not susceptible to decay, they are not afraid of exposure to any aggressive detergents or accidental contact with a chemical substance on their surface.
- Quality. Plastic refers to high quality materials: it will not fade if it is exposed to direct sunlight for a long time, which means that you can always restore some part of the finish with the material that remains in your stock, and there is no difference in tone when this will not be observed.
- Practicality. Despite the fact that the wall coating looks like a monolithic material, there are gaps for ventilation in it, and this fact does not make it possible to have fungus or mold under it.
- Cellularity of the structure. Due to the cellular structure of the panels, increased sound insulation and thermal insulation are provided. In addition, the product is antistatic and therefore does not attract dust to its surface.
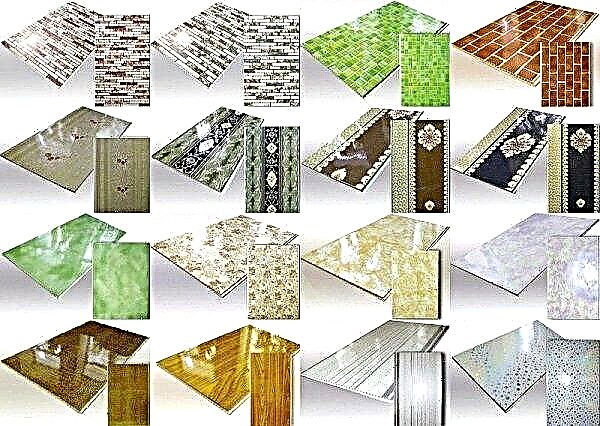
Another big plus of plastic panels is that they have the widest palette of colors, tones and patterns.
Material cons
Material that would have only advantages, and did not have a single drawback, has not yet been invented (if at all possible). And PVC panels for decorating a balcony are also not a universal option.
- Mechanical damage. Instability to mechanical stress is the main and indisputable minus of the plastic coating. If the panel is accidentally hit with something hard or sharp, it will easily burst. In addition to this, it will not withstand a relatively small but point pressure - in this place the material is deformed from the outside. In such cases, the situation can only be corrected by completely replacing the damaged panel.
- Toxic If a fire breaks out inside a room decorated with this material, then molten plastic will fill the room with toxic substances, although today the vast majority of materials have this drawback.
- From a psychological point of view. Human psychology is so arranged that it is commonly believed that since the material is so inexpensive, it will not be prestigious to use it when it comes to luxury repairs in the room.
Types of materials for balcony cladding
A huge variety of loggia claddings are being sold on the construction market. Here are just a few of them:
p, blockquote 3,0,0,0,0,0 ->
- Wooden lining. It is of two types - from conifers, represented by pine and cedar, and deciduous - from alder, oak and linden. An indisputable advantage is the environmental friendliness and durability of this material, and the minus is the price and weight of the skin.
- Sandwich panels. They have two front layers, between which there is a heater. With a flat surface they can be glued. The downside is that they are only white.
- MDF panels. Decorating a balcony with MDF panels is easy to maintain and is one of the most common ways to decorate a balcony. This material is nothing more than pressed wood chips, which are glued together by lignin. For decor, such shavings are covered with a thin film, imitating various natural materials, for example, stone or wood.

PVC or plastic panels
A separate item should be considered the features of plastic panels, as the most popular and affordable covering material.
p, blockquote 4,0,0,0,0,0 ->
- Affordable price. The cost of plastic panels will depend on various configurations. However, for most middle-income families, the price will remain acceptable.
- Simple installation. Finishing a balcony with PVC panels is a very simple process. With a careful approach to the instructions, self-cladding the entire balcony is quite real.An important factor in favor of plastic is the easy replacement of one plate with another in case of slight damage, or the simple dismantling of all materials during overhaul.
- Durability. The service life of plastic panels is from 25 to 50 years. This material does not emit harmful substances and is completely harmless (exception - in case of fire). The safety of the panels is ensured by endurance to aggressive detergents and accidentally spilled chemical compounds, as well as resistance to all kinds of rotting and fungi.
- Quality. With prolonged exposure to sunlight on the surface, plastic panels do not fade. Therefore, in the case of replacing one plate with another, there will be no difference and the balcony will retain its original appearance. In addition, the antistaticity of PVC perfectly resists dust, which greatly facilitates the cleaning process.
- Practicality. Thanks to thoughtful little things, such as micro-gaps between the panels, the walls breathe freely. This fact perfectly counteracts mold fungus.
- The cellular structure of the panels. Internal plastic chambers guarantee additional sound and thermal insulation of the material, which allows the use of additional space as a living room.
- A variety of models. PVC plastic panels have the widest palette of shades and textures, so even the most demanding customer will find their own version.
Important! Plastic coating is easily susceptible to mechanical damage. Even a slight blow with a sharp or hard object leads to its rupture, therefore, such material must be handled very carefully and accurately.
How to choose plastic panels
In order to purchase high-quality casing, it is necessary to pay attention to its following properties:
Important! The color of the panels should not be grayish. Otherwise, this will mean that the plastic is molded from low-quality recyclables.
Orientation of the balcony to the cardinal points is a very important aspect, especially when choosing the color scheme of the material. If the balcony is low, oriented to the north side, and it is obscured by tall bushes, then choosing a dark finish is impractical - a small room will look even smaller in volume.
p, blockquote 8,0,0,0,0 ->

p, blockquote 9,0,0,0,0 ->
How to calculate the right amount of plastic panels
In order not to buy extra squares of material, you must first make accurate calculations of the planned area for the casing.
p, blockquote 10,0,0,0,0 ->
- We measure the area of each surface. To do this, multiply the width by height.
- Summarize all the areas.
- We calculate the "unnecessary" area of the openings - windows and doors.
- Subtract square meters of openings from the sum of all areas - this will be the final result.
- Now divide the resulting difference by the area of one plastic panel. They are different, so it is very important to clarify the dimensions of the selected model in advance.
What tools are needed for decorating the loggia with plastic panels
Before starting work, you need to take care not only of the material, but also of the availability of all tools. The following is a list of the main "helpers":
p, blockquote 11,1,0,0,0 ->
- Stationery knife or hacksaw. They are needed for cutting plastic panels. Both the one and the other tool are great for these purposes.
- Building level. It is necessary when installing a wooden base.
- Square and ruler.
- Drill. The wooden crate is fastened with dowels or long self-tapping screws with plastic sleeves, the installation of which requires a drill.
- Construction stapler. The brackets attach the panel itself to a wooden block. Possible with a screwdriver or screwdriver.

Methods of mounting plastic panels
Covering the balcony with plastic panels is possible in two versions:
p, blockquote 12,0,0,0,0 ->
- Glue method. In order to save space, some resort to simply sticking the panels on the wall. This is done very quickly and easily. However, it should be borne in mind that the working surface must be perfect - even and clean. The adhesive method has two significant drawbacks - loss of thermal insulation, because there is no air chamber between the wall and the panel and the impracticability of partial repairs in the future.
- Fastening plastic to a wooden crate. This method requires a little more accuracy than the previous one, but all of its disadvantages here turn into advantages.
Important! Using plastic panels, you need to know that at high or low temperatures they can be deformed. Therefore, the mount must be non-rigid, which will prevent material deterioration.

Preparation of work surfaces
In order for the skin to be of high quality and durable, you must first take care of the base:
p, blockquote 15,0,0,0,0 ->
- First, carefully inspect the walls for cracks and imperfections - they should be favorably disposed of.
- Then you need to slightly increase the crack. To expand the gaps, you can use the grinder.
- Then the crack must be well cleaned from dust and debris.
- The resulting recess must be sealed with waterproof putty.
- The entire surface must be primed with the introduction of a protective composition (sealing and antiseptic properties). A huge number of them are represented on the construction market, but if an economical option is needed, then PVA putty should be used. It has a low cost, and the quality is acceptable.

Lathing mount
The lathing is a special frame that is attached to the wall and on which plastic panels will subsequently be fixed. It is of two types - wooden and metal. The latter is well suited for damp rooms, as the profile will not gain moisture and damp, but the cost will be much higher than wood and installation will require certain professional skills.
p, blockquote 16,0,0,0,0 ->
High-quality installation of the grill, in the future, will make it possible to make partial repairs, replacing only one or more damaged plates. When the plastic is completely replaced with any other material, the crate does not need to be changed - the old one withstands the same thickness of the material.
p, blockquote 17,0,0,1,0 ->
- Before installing the battens on the walls, you need to make markings. This will greatly simplify the work of mounting rails. When drawing lines, use a level. Such actions will come in handy later in checking the quality of installation.
- Before fastening, wooden blocks must be treated with a protective compound. To do this, you can take PVA putty or engine oil. Such impregnation will protect the tree from rotting, mold and fungi.
- Now you need to fill the slats every 40-50 cm. The first one needs to be attached 5 cm from the ceiling, checking the clarity of direction with the building level. All subsequent boards should go in strict parallel to the previous one.
- Fastening of strips is carried out due to expansion bolt shields or self-tapping screws with plastic tips. With tightening the slats to the wall, you should not rush. A situation may arise when the level shows a skew and then you have to lay small plates to restore a perfectly flat surface. The dowel should go into the wall 3-4 cm (excluding plaster).
Important! When attaching the grill, one should take into account the places where the plastic breaks most often - at the level of the knee, belt and shoulder. In these places, fixing panels to the tree is required.
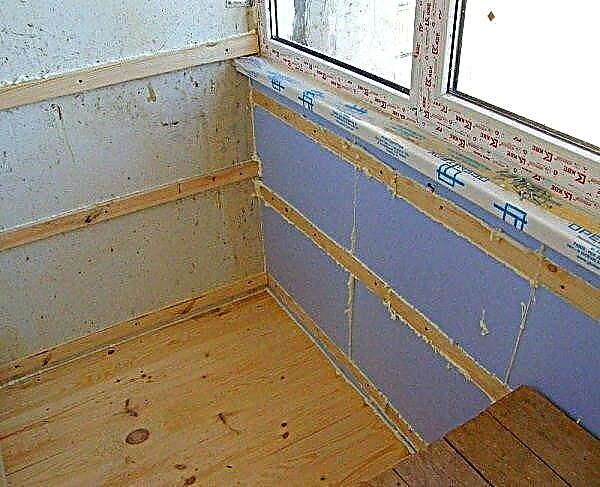
Loggia insulation
How to sheathe a balcony so that it becomes not only beautiful, but also warm? This excites many who wish to sheathe a balcony on their own. To do this, you need:
p, blockquote 19,0,0,0,0 ->
- Choose a heater. The simplest is inexpensive foam. It is acceptable in density and is not afraid of moisture, which makes it the most popular option. Extruded polystyrene foam will significantly exceed the foam in its characteristics, but the price of such a heater will be an order of magnitude more expensive. Mineral wool is an excellent option, there is only one drawback - it needs additional waterproofing. Without it, when moisture gets on the material, the insulation immediately loses its properties.
- Place the insulation evenly. Polyfoam needs to be tightly planted between a wooden crate, and the gaps to blow out with mounting foam.
Important! In warm climatic conditions, as a heater, you can use foamed penofol. It is evenly distributed and attached to the wall before starting work with a wooden crate.
Installation of plastic panels
Installation of plastic on the walls is usually carried out vertically, and on the ceiling - transverse stripes. There is also a third styling option - diagonal, but here you can’t do without the help of specialists - you need very good skill. In addition, the amount of waste will be significantly greater than with other methods.
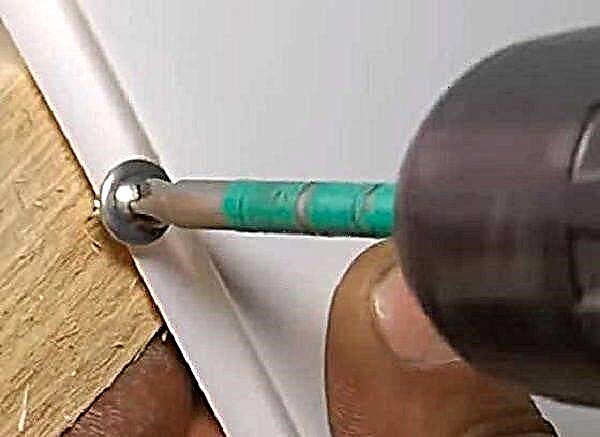
p, blockquote 21,0,0,0,0 ->
- First you need to attach the first guide with a stapler. They are of different types: U-shaped, for the initial installation of the first bar, H-shaped to enlarge the short bar, F-shaped to hide cavities, L-shaped, angled, ceiling and floor, respectively, each for its purpose.
- Fixing the first bar. The lining process should begin with the farthest and most difficult corner of the balcony. The bar must be inserted into the guide profile and level its verticality level. Then fix it by attaching the thin side to the wooden crate with screws.
- Subsequent slats are inserted into the grooves of the previous one in turn, using a special lock (by clicking).
- The fastening of plastic to wooden beams should occur in a checkerboard pattern - through one panel.
- In order to adjust the plastic to the desired size for cutting across it is necessary to use a hacksaw for metal, and for longitudinal cutting - a regular stationery knife.
- For reliable joining, the extreme plates should be pre-cut to the required size and only then put it in a row.
p, blockquote 22,0,0,0,0 -> p, blockquote 23,0,0,0,1 ->
Thus, you need to walk on all surfaces. Joints must be closed with special plastic corners.
PVC materials
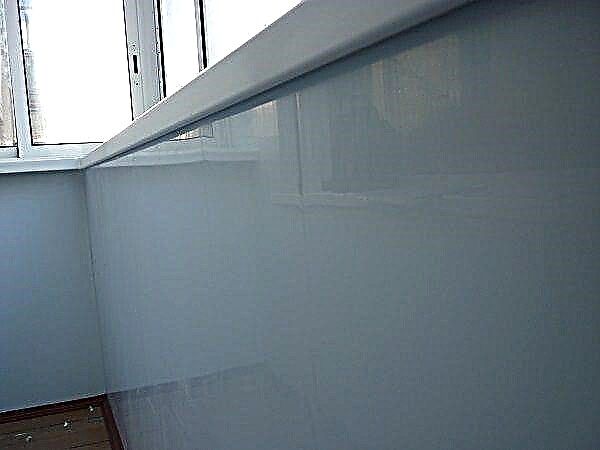
The interior or facade of the balcony can be sheathed with seamless panels, which in the finished version look like a homogeneous canvas (without mounting gaps) or suture, which have small gaps between the plates.
Also, plastic panels are excellent in the following ways:
- the size,
- surface finish of the material
- preparation method.
For facing work on the loggia (balcony), PVC material is often used from the inside, the average width of which varies from 0.25 to 0.4 m. A plastic lining with an even smaller 0.2 meter width is a good alternative (not bad for covering the ceiling).
Thermal printing
Plastic panels have a variety of surface finishes, one of which is thermal printing. With the help of thermal printing, the decoration of any degree of complexity is applied to the surface of the finishing material, from bright saturated, but simple drawings to exotic episodes, photographs and complex mosaics. Each pattern is transferred to plastic using a special thermal film, after which it is fixed with varnish to protect the decoration and create a more attractive, shiny surface.
Offset printing
Another equally practical way to transfer a picture is to use offset printing. Using it, almost everything is transferred, including complex paintings, photographs, etc., but as practice shows, various imitations of stone are in great demand. It is displayed by means of a typographic form of printing and varnishes to create a beautiful, glossy surface of the plate.
Lamination
The third option for finishing plastic is a laminated film with a finished image. A sticker on the surface of PVC from a laminated film can convey a high image of any pattern, photograph, etc., as well as high-quality imitations of natural elements of nature: stone, wooden materials, leather, etc. Plastic panels coated with a laminated film are considered an excellent material for finishing work, which is characterized by antistaticity, low cost and unpretentiousness for cleaning.

- Conventional cladding plastic is produced by pressing a polymer substance or polyvinyl chloride, which is almost half composed of rock salt and various components such as petroleum products, coloring materials, etc.
- Standard “sandwich” - the panel consists of two-layer PVC with heat-insulating material inside.
The single-sided panel has a surface that is stronger than the standard one and has been successfully used for interior cladding.
“Sandwich” - for slabs, in most cases they do not need additional hydro, steam or thermal insulation, but during plastic sheathing, sometimes there are small difficulties due to the size of the products.
Pros and cons of working with plastic panels
The decoration of the balcony with pvc panels over the past few decades has been quite firmly entrenched among the population. Firstly, it is completely environmentally friendly, since the basis of polyvinyl chloride does not contain toxic substances, and secondly - the material has a high resistance to a humid environment.
The following factors are also considered significant advantages of the material:
- For the installation of plastic trim, there is no need to further align the surface of the wall or ceiling.
- The panel is lightweight, which does not overload the overall design of the balcony.
- The material is not picky about leaving (just a damp cloth is enough for cleaning).
- It is inexpensive, has a huge assortment of colors and textures.
- Easy to install.
Plastic balcony paneling includes several disadvantages:
- Changing the characteristics of PVC under the influence of high temperatures.
- Susceptibility to low temperatures.
- Weak resistance to physical activity.
In the event of an increase in temperature from direct contact with fire (heating, ignition), plastic emits pungent smoke and a poisonous smell that can threaten human health.
It is advisable to finish the balcony with plastic panels only on insulated structures, since plastic is deformed due to the intense exposure to low temperatures.
Part of the construction PVC is practically not able to reflect even moderate mechanical damage, so the recommended material density should be at least 8 mm.
Step-by-step instructions for finishing the balcony with plastic panels
Installation of a balcony room is done using:
- Direct mounting metal profile.
- Angular dihedral metal profile.
The straight line is fixed on the side of the cross member or through the lateral, wide part of the crate, and the corner is fixed on the inside as well as the outside corners.

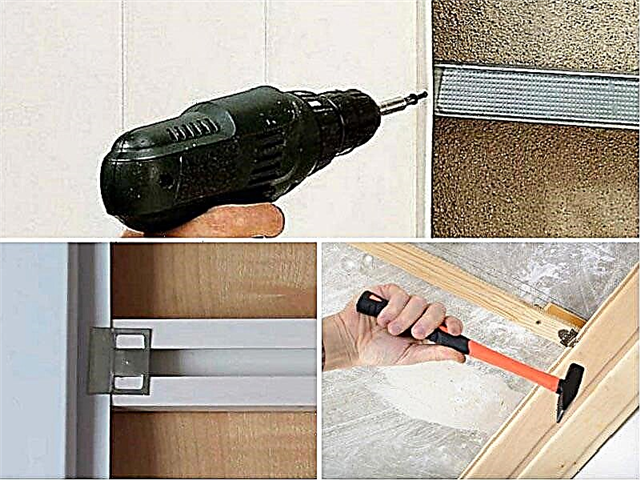
Tools
The first thing you can’t do without in the lining of a balcony is the tools, namely:
- Electric drill or hammer drill.
- Screwdriver (with magnetic attachment).
- Building level.
- Foam for mounting.
- Plastic skirting boards and corners.
- Window sill and galvanized profile.
- Insulation, suspensions and small dowels (self-tapping screws are also useful).
After the tools are prepared, we can begin to trim the balcony or finish the loggia with pvc panels.
Finish the ceiling
High-quality covering of the balcony with plastic panels with your own hands begins only from the ceiling, and after you have installed the metal frame - installation is carried out in the following sequence:
- We fix the starting metal profile on the ceiling surface. Using a puncher, drill holes in the profile itself (do not forget about the wall as well), insert the dowels. After that, we fix the frame with a screwdriver.
- We determine the middle of the future design, after which we fix the profile on iron suspensions.If the width of the loggia allows, then one central will be enough, and if it exceeds 120 cm, it is advisable to use two.
- We mount starters intended for installation of PVC panels to the central galvanized profile.
- If necessary, we make wiring for future lighting of the balcony.
- We install the first plastic in the start profile, fix it with screws.
- We put the following plastic panels butt to each other and also fasten to the profile.
- We shorten the last PVC so that the material goes 5 mm behind the previous plastic.
- We swap the two extreme panels so that the latter goes into the farthest profile without the slightest clearance.
Installation of wall decoration
After we have mastered the ceiling, we proceed to the installation of the first wall. The work will be very reminiscent of the installation of the ceiling, although the installation of the loggia decoration with plastic panels, like the balcony, should begin with the space under the windows.
- We begin to mount the galvanized profile below the windows.
- We establish on it the accuracy of placement of extreme metal profiles using the building level.
- We fix it in the middle of the wall and at floor level.
- We mount several suspensions on a metal base under the windows (the gap should be 0.5 meters).
- We fill the empty space between the profile and the wall with a building insulation, for example mineral wool, and then fill up all the cracks with foam for installation. Finishing balconies with photo panels should look exactly like this:
- Next, we fix the guiding metal profile on the suspensions.
- We install plastic panels on fixed profiles using conventional wall plugs or self-tapping screws.
- We eliminate various gaps between the PVC wall sheathing and the floor with plastic skirting boards, we close the gaps in the ceiling area with a special ceiling skirting board.
Benefits and material choices
Plastic balconies are preferred for the following reasons:
- The material is not exposed to moisture.
- It will not spoil rodents and insects.
- It does not fade under the influence of ultraviolet radiation.
- Not subject to cracking after a certain period of use.
- It has a high level of strength of the front surface.
- Products are manufactured in a wide range (just colored panels or with imitation of stone, wood and so on).
Before you sheathe the balcony with plastic panels, you must correctly select the finishing material. The modern construction market offers products with a width of 25, 36 and 50 cm. For a novice master, narrow panels are better suited, since it is easier to work with them.
 Plastic panels are not afraid of moisture and sunlight, as well as unpretentious care
Preparatory work
Do-it-yourself paneling of the balcony with plastic panels begins with preparing the surfaces. To do this, do the following operations:
- Remove the old coating, clean the walls of paint, residues of wallpaper and so on.
- Tap the walls and ceiling with a hammer to identify weaknesses. Remove loose fragments.
- Knock down bulges with a perforator and remove dust from surfaces.
- Seal the holes with cement-sand mortar and leave it to dry for 2-3 days.
- If the flooring is not yet ready, then now is the time to do it.
 Preparing walls for PVC paneling
 At the very end, the walls and ceiling should be treated with an antiseptic primer 2-3 times at 4-hour intervals. This is required to protect surfaces from mold and mildew.
It is important to remember that finishing work can only be done on a glazed and insulated balcony. Also, a waterproofing layer should be laid in advance, which will keep the base dry. If mineral wool was used as a thermal insulation material, it is necessary to lay 2 layers of waterproofing to prevent it from getting wet.
 Balcony waterproofing
Essential Tools and Supplies
Covering balconies with PVC panels requires the following tools:
- Construction level (you can do the simplest).
- A special knife on drywall (with its help it is convenient to cut panels for a balcony).
- Construction stapler.
- Phillips screwdriver.
- Screwdriver or electric drill at low speeds.
- Hacksaw for metal.
- Rotary hammer with 6 mm drill bit.
 Tools that will be required for finishing the balcony with plastic panels
To sheathe a PVC balcony with your own hands, you need to prepare a number of consumables:
- Plastic panels for the balcony, starting, connecting and F-shaped profiles, outer corners and baseboards.
- Dowels (length - 8 cm, thickness 6 mm).
- Self-tapping screws, staples, kleimers, depending on the type of fastening chosen.
 Consumables required for the installation of PVC panels
 How to fix products to the surface
To sheathe the balcony with plastic, you must also choose the method of fastening these products to the wall. The easiest option is mounting on liquid nails. This method is perfect if the walls and ceiling on the loggia have been leveled relatively recently, and there are no large drops and blockages. Such coverage will last as long as the glue itself serves, therefore, before buying, it is better to consult the seller about this.
The next option is a metal crate of the balcony. It is more suitable for installing panels on the ceiling, because in this case the frame should be more durable than on the walls. Working with such material is quite complicated, but the result is worth it.
 The metal crate is most often used for covering the ceiling.
To sheathe a balcony or loggia with plastic panels, a frame of PVC strips is also used. This option is practically not used by home masters, since it requires skill and accuracy. Installation of the frame is slightly facilitated by the presence of special fixing clips.
But the wooden crate remains the most popular. This is the easiest and relatively inexpensive way to decorate the balcony. For this operation, wooden slats 50x20 mm and ordinary wall plugs will be required. Provided that there is a waterproofing on the loggia, the tree is not deformed.
Crate mounting
This installation option is perfect if the walls are heavily littered to the side or have a large number of bumps and other defects. In addition, the presence of cavities under the crate will additionally insulate and soundproof the balcony. Also, if it is planned to install heating radiators or conduct any engineering communications, they can be hidden in the voids under the panels.
 The installation of the battens on the balcony allows you to additionally insulate the room
Fasteners for installing products on the crate
The following fasteners can be used to sheathe the balconies with PVC panels:
- Self-tapping screws. Depending on the type of frame chosen, wood or metal screws will be required. This type of fixation is reliable and stiff, despite the fact that the hardware is very inexpensive. For finishing the PVC balcony, self-tapping screws 15-20 mm long are suitable.
- Staples. Products are installed in a construction stapler, with the help of which fixation takes place. The advantage of this method is its high speed. But the reliability of such a connection is low. In addition, if it becomes necessary to replace one of the panels, it will be difficult to remove the clips.
- Kleimers. They are installed in the narrow part of the panel, after which they are fixed with small carnations or screws. This option is not considered the most reliable, since kleimers are made of thin metal. This leads to the fact that when even a slight pressure is exerted on the panel, the part can be bent, due to which the PVC product simply disappears.
 Mounting options for plastic panels
Ceiling lining
The interior decoration of the balcony starts from the ceiling. To do this, you must first make the crate:
- The first step is to mark the ceiling surface. To do this, determine the center of the ceiling and draw a longitudinal line using the building level. Then marking is carried out along the perimeter of the ceiling, retreating along the wall by 5 cm. The evenness of all lines is checked by the building level.
- Then, on the perimeter of the surface, you need to attach a galvanized profile and drill holes in the wall to a depth of 5 cm in increments of 25-30 cm.
- Take the dowel screws and sequentially fix all the profiles under the ceiling so that a metal border is obtained. This must be done with a screwdriver equipped with a magnetic nozzle.
- Then you need to install a longitudinal profile under the plastic panels. If the balcony is small, then one product is enough, if its width is more than 1.2 m, then two will be required. Fixation occurs in the same way as in the case of side profiles.
- Further, starting profiles are attached to the longitudinal bar, on which the panels will be mounted on the balcony.
- If you plan to install fixtures, then stretch the wiring at this stage.
 Mounting the lathing on the ceiling under plastic panels
Now begins the direct decoration of the balcony with panels:
- The first plastic strip is mounted in the starting profile and fixed to the longitudinal rail with metal screws.
- The following panels are installed in the groove of the previous one, and the free edge is also fixed with metal fasteners.
- Now, you may need to trim the material. The spike of the last product is cut to 5 mm, after which the panel is installed in the groove of the previous one.
On a note! Trimming panels is necessary to adjust the gaps, but if you do not want to do this, you can purchase special plastic moldings.
On this, the ceiling finishing work on the balcony is over. You can familiarize yourself with the plastic panel sheathing process in more detail by watching the video below.
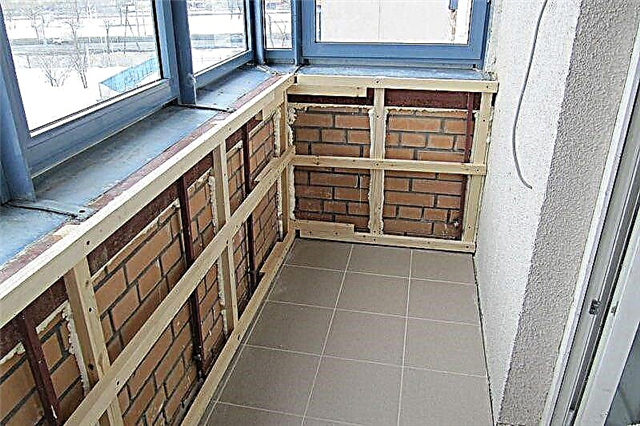
Wall decoration
The next step in the decoration of balconies is wall cladding. To do this, it is better to use a wooden crate:
- The first two slats are mounted taking into account the construction level at a distance of 10-15 cm from the floor and ceiling.
- Then set the vertical rails so that they form a horizontal right angle.
- A metal profile is fastened under the window, which will subsequently become the basis for the windowsill.
- On surfaces without openings, you can do with installing only horizontal guides.
- After that, horizontal and vertical wooden products with a pitch of 0.4-0.6 m are installed to the wall using dowel screws.
- To design the corners, small bars are used, which are connected by wood screws.
 The fastening of the wooden crate is carried out using self-tapping screws or dowels
Important! If you plan to install a heating system on the balcony, it is important to highlight a niche for this even at the stage of arrangement of the crate.
The following is the installation of PVC panels in the same way as described above. Then all edges and outer corners are closed with special plastic plugs, and baseboards are mounted on the floor covering. If a radiator is installed, then it is closed with a grill to provide access for air flow.
Glue installation
In this case, marking and no additional fasteners are required. The walls are prepared, after which liquid nails are applied to the back of the panel and pressed to the surface. It is better to remove the remnants of glue that gets on the edges of the panel immediately, because after hardening it will have to be cut with a knife. The next product is also mounted, but with the stud in the groove of the previous one. So the entire area is processed, and the corners and edges are closed with caps.
Some finishes
The standard technology for surface finishing on the balcony is described above. But there are also some tricks, thanks to which the coating will last longer and will have a presentable appearance:
- The joints and walls must be decorated with a plastic start to mask the transition.
- On the floor, the joint will be hidden by the baseboard, but it is better to close the corners with a special profile.
- Instead of a profile, you can use a cap of your own manufacture. To do this, remove the strip of plastic with a width of 0.5-1 cm from the remaining panel, after which it should be heated with a building hairdryer and bent by placing a block. The result is a corner.
 Homemade corner from the panel
After all of the above - the dilemmas of how to make repairs on the balcony with your own hands should not arise. The main thing is to follow the recommendations and carefully choose the materials. Going out for a purchase, it will not be amiss to take a person with competence in this matter so as not to purchase low-quality products.