Any repair is accompanied by wall plastering, since this type of construction work not only eliminates surface defects, but also prepares the base for decorative decoration. One of the most popular types of plaster is gypsum mortar. It is characterized by high quality, ductility and durability.
In addition, this plaster is easy to use and excellent for wall decoration in all residential premises. The surface plastered with gypsum mixture becomes even and smooth, after which it can be glued with wallpaper or painted.

Advantages and disadvantages
Gypsum plaster is a universal building material, which is widely used in construction and finishing works. It is made using special technologies from environmentally friendly raw materials, so it has a unique structure and is easily applied to walls. Like any mortar, plaster has its advantages and disadvantages.
Its positive characteristics include:
- Naturalness. The main constituent component of the material is gypsum; it is a natural material and does not contain harmful substances. Therefore, such a lining is completely safe for health.
- Light weight. Due to this indicator, the machined structures acquire perfect integrity and do not require additional reinforcement.
- No shrinkage. After finishing, the walls become smooth and no cracks appear on their surface.
- High moisture resistance. Gypsum quickly hardens and dries. Drying time takes several hours. If water gets on the finished layer of the plaster, then it will not affect the quality of the coating, and the finish will not crumble or crack in the future.


- Fungus resistance and mold.
- Creating a microclimate in the premises. The porous structure of the material can absorb excess moisture, and at high temperature it releases it back.
- Good sound and heat insulation.
- High fire safety.
- Plastic. It is easy to work with this type of plaster, since application is quick. In addition, the solution perfectly eliminates all the bumps in the walls.
- Economical consumption. Unlike other mixtures, gypsum mortar is applied in a single layer up to 60 mm thick, which saves it.

As for the shortcomings, there are few of them:
- Do not finish in rooms where there is constantly high humidity.
- The material is characterized by high cost.
- Work must be performed in small areas. Gypsum quickly hardens, so you can not prepare a solution of large volumes.


Material selection
Gypsum plaster is considered the main finishing material, which is widely used in modern construction. Today, the market is represented by a huge selection of gypsum-based mixtures, with which you can plaster the surface of the walls. Therefore, before making a purchase, you need pay attention to the quality properties of the material. It must have a uniform structure and comply with all building codes.. Good plaster perfectly aligns the base, makes it smooth and does not create smudges, stains or bubbles on the surface.
Also important choose the material, taking into account the climatic conditions in the room where the decoration is planned. Although gypsum plaster is moisture resistant, it is undesirable to expose it to constant exposure to steam and condensate.


When plastering large areas, it is best to give preference to solutions that are applied in a single layer, due to this the coating thickness will be small and material consumption will be reduced.
You can buy gypsum plaster both foreign and domestic production. Well-known trademarks of Knauf and Volma. Their products are used for interior decoration, it perfectly prepares the walls for decorative decoration, there is no need to wipe their surface. It should be noted that irrespective of the chosen plaster, it must be used strictly in accordance with the requirements, indicated on the package. Otherwise, the solution will lose its properties, and the application technology will be performed incorrectly.
Mixtures for leveling surfaces
There are several main types of plaster, which differ not only in their composition, but also in their intended purpose.
 The usual mixture is designed to protect the walls from the negative effects of external factors, smooth the surface and eliminate minor defects. After using ordinary plaster, it is customary to apply a decorative coating to the walls.
- As for the special type of plaster, it is intended solely to provide thermal and sound insulation of rooms and premises. The composition is able to provide coating of surfaces with a special screening layer, which can protect the walls from negative effects, for example, from x-ray radiation.
- But decorative plaster is designed just to give the walls of the room a complete look. It is applied at the very end to conventional plaster, as a result of which the walls are bright, even and smooth.
 The usual mixture is designed to protect the walls from the negative effects of external factors, smooth the surface and eliminate minor defects. After using ordinary plaster, it is customary to apply a decorative coating to the walls.
For leveling surfaces and eliminating defects (potholes, cracks and so on) in residential premises, conventional gypsum plaster is used, which is presented on the market in a large assortment.
Types of plasters for walls
To make a quality finish the surface of the walls, you can choose one of the following options for mortar for plastering.
 Cement-sand mixture is used to correct severe defects on the surfaces of walls and alignment of various planes. The main thing is to properly prepare the solution. It can be used to cover not only internal but also external surfaces. Great for processing brick walls, and can also serve as the basis for decorative tiles.
- For interior decoration, lime-sand plaster is perfect - it is used exclusively for indoor use. This is due to the fact that the plaster has a less durable consistency. However, this variety has its advantages: the mixture has a unique quality, which is the ecological purity of the composition.
- The best option for processing walls and ceilings in an apartment is a gypsum mortar containing polymer additives: alabaster and selenite. It is thanks to this composition that it is possible to achieve a very smooth and even surface with minimal time and effort.
 Cement-sand mixture is used to correct severe defects on the surfaces of walls and alignment of various planes. The main thing is to properly prepare the solution. It can be used to cover not only internal but also external surfaces. Great for processing brick walls, and can also serve as the basis for decorative tiles.
Another universal component added to the stucco solution is the magnesia mixture. Using a solution with the addition of this element, internal finishing work is carried out in various rooms.
Varieties of gypsum mortars
Gypsum mixtures are environmentally friendly, excellent quality characteristics and high performance indicators. They differ in content and amount of polymer components that make up the mixture.
 Solutions containing special polymer fillers, which increase the quality of noise and sound insulation in rooms, are suitable only for processing internal surfaces of rooms. Such gypsum mixtures can include completely different fillers, for example, perlite, fine foam, vermiculite and other components.
- Budget options for gypsum plasters include a minimal amount of polymer components. Therefore, such solutions have a lower degree of adhesion and require additional priming at the beginning of their use. To process the walls, applying several layers of plaster, as well as creating special grooves on each of them, to increase the best connection with the treated surface.
- If you take plaster mixes for processing the surface of the walls by machine, then they are distinguished by an excellent degree of ductility. Moreover, if you apply the solution on a plane manually, the plasticity of the solution will be much worse.
- The most high-quality and expensive versions of gypsum mortars for plastering rooms include a large number of different polymer components. Thanks to this, the plastering process is much simpler and faster. Such mixtures have a high degree of adhesion and adhesion to the surface. Ideal for interior repairs.
 Solutions containing special polymer fillers, which increase the quality of noise and sound insulation in rooms, are suitable only for processing internal surfaces of rooms. Such gypsum mixtures can include completely different fillers, for example, perlite, fine foam, vermiculite and other components.
Before you buy a gypsum mixture, it should be noted that it is applied only to concrete, gypsum, aerated concrete and foam concrete surfaces. It is important that the surface on which the composition is applied is not subject to deformation under the influence of moisture.
Key Benefits
The popularity of using mixtures for surface treatment of rooms is due not only to the simplicity of working with plaster, but also a number of other positive aspects.
 Gypsum mortars are not susceptible to severe overheating and are flammable, which is an undoubted advantage for rooms treated with this composition.
- Plastering the walls allows you to achieve a smooth and even effect, so you can get rid of various surface defects.
- Profitability. To cover the surfaces, a very thin layer of plaster should be applied - about five millimeters.
- Since the composition has low thermal conductivity, it plays the role of an additional insulation for wall surfaces.
- After hardening, gypsum plaster becomes so strong and hard that it allows you to drive large nails into the walls, screw in screws, work with a drill without fear of damaging the surface of the coating.
- The environmentally friendly gypsum material has one unique ability: it can quickly absorb excess moisture in the room, and when the air is too dry, on the contrary, give moisture away. Due to which the rooms always have a balanced microclimate.
- This material does not have a specific unpleasant odor characteristic of most types of plasters. Moreover, gypsum is a hypoallergenic material, and therefore it does not cause any allergic reactions.
 Gypsum mortars are not susceptible to severe overheating and are flammable, which is an undoubted advantage for rooms treated with this composition.
The only significant drawback is that gypsum plaster can not be used for exterior decoration, since this material has a high degree of hygroscopicity.
Before you learn how to plaster walls at home, you should definitely familiarize yourself with basic rules of work with gypsum plaster.
Rules for working with gypsum plaster
In order for the plaster to lie flat on the surface of the walls, and in the process of self-repair, no defects appear, a number of mandatory recommendations for working with the material should be considered.
So, how to plaster the wallsto achieve the most effective result.
 First you need to prepare the surface on which the composition will be applied. To do this, the walls or ceiling should be cleaned of dust and dirt, and if there is old plaster, then it must be removed. It is best to pre-treat all surfaces with a primer - this will help create the best adhesion of the plaster to the surface.
- Before you begin, you need to determine what layer the coating will have. The fact is that the thinner it is planned to apply a layer of solution, the less dense the composition should be. If it is planned to make a thick layer of plaster, then the mixture should be thicker.
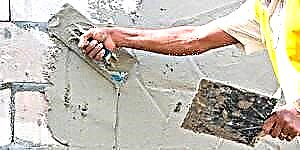
- To evenly apply the mortar to the walls, use a spatula. If you need to fix the layer of plaster, then for this it is better to use a trowel, an equalizer of angles or a trapezoid rule.
- It is very important to remember that for the correct application of the solution, the first layer must be applied in the horizontal direction, and the next layer in the vertical direction.
 Every new always apply at least three hours apart. For the final drying of the plaster, it takes five days, after which it can be glued wallpaper or paint.
- When working with gypsum material, it is necessary to exclude the likelihood of drafts penetrating into the finished premises - this is the main reason for poor quality work.
- If the solution begins to set and does not adhere well to the surface, it should not be diluted again to extend its useful life. If you ignore this rule, the plaster will lose all its quality characteristics, lose strength and shrink after drying.
 First you need to prepare the surface on which the composition will be applied. To do this, the walls or ceiling should be cleaned of dust and dirt, and if there is old plaster, then it must be removed. It is best to pre-treat all surfaces with a primer - this will help create the best adhesion of the plaster to the surface.
 Every new always apply at least three hours apart. For the final drying of the plaster, it takes five days, after which it can be glued wallpaper or paint.
Given these recommendations, you can begin to independently plaster the required surfaces.
How to dilute the solution
The procedure for preparing the gypsum composition is very simple and includes only a few steps. It is important to observe the necessary proportions.
 You need to take a deep container, pour in from 0.5 to 0.7 liters of water (depending on the desired consistency) and pour exactly one kilogram of gypsum powder into it.
- Then the mixture is thoroughly mixed until a homogeneous consistency. You can mix manually or using a construction mixer.
- After this, you need to let the mixture brew a little - five minutes will be enough, then mix again.
 You need to take a deep container, pour in from 0.5 to 0.7 liters of water (depending on the desired consistency) and pour exactly one kilogram of gypsum powder into it.
It is important to note: the finished solution retains its properties for only half an hour, so during this time it must be fully used. If during this time the mixture is not used and remains, do not try to dilute it again with water and use for plastering.
How to plaster a wall: instruction
So, after preparing the surface for plastering, you should mix gypsum mortar. After this, the process of coating the walls takes place in several stages.
 On the surface to be treated, it is first necessary to fix the guide beacons. Moreover, they need to be installed in such a way that the future layer of plaster is as thin as possible. These devices are fixed with a solution using a level for marking on the walls. It is worth remembering that the distance between the beacons should not exceed 50 cm, since the smaller it turns out, the easier it will be to put plaster on the surface of the walls.
- Then, guided by the previously installed beacons, a solution is applied to the surface, after which it is carefully leveled using a special h-shaped rule tool. Surplus mixture must be removed, and if necessary, they will close up strong potholes and cracks.
 After the coating dries a little - it will take about half an hour, it is again leveled, but with the help of another tool called the cutter rule. Initially, a trial undercut is performed, and if the tool does not peel off the top layer of the stucco mortar, while clinging to the mortar, then the treated surface is left to dry for a few more minutes. It is important not to miss the moment, so as not to overexpose the solution.
- After two hours after applying the layer, the wall is re-smoothed with a spatula. If you want to give the surface a glossy shine, the next day you need to spray the treated walls with water using a spray gun, after which they are polished with a spatula until the desired result is obtained.
 On the surface to be treated, it is first necessary to fix the guide beacons. Moreover, they need to be installed in such a way that the future layer of plaster is as thin as possible. These devices are fixed with a solution using a level for marking on the walls. It is worth remembering that the distance between the beacons should not exceed 50 cm, since the smaller it turns out, the easier it will be to put plaster on the surface of the walls.
 After the coating dries a little - it will take about half an hour, it is again leveled, but with the help of another tool called the cutter rule. Initially, a trial undercut is performed, and if the tool does not peel off the top layer of the stucco mortar, while clinging to the mortar, then the treated surface is left to dry for a few more minutes. It is important not to miss the moment, so as not to overexpose the solution.
Everything, the surface is ready for the final stage - wallpapering or painting.If in the process of plastering it is not required to achieve a perfectly smooth and smooth result, then it is not necessary to use beacons.
General information
Preliminary alignment of horizontal and vertical surfaces of ceilings and walls is the main purpose of gypsum plaster. It is used for finishing work surfaces on the final decorative finish.

that it can be applied in a thick layer and thanks to this it successfully copes with all irregularities and defects.
Gypsum-based plaster can mask obvious wall defects, including holes and serious damage. Gypsum plaster is used for processing ceilings and walls with high quality, which allows further lining, painting of walls or wallpapering.
Characteristics and place of use
Gypsum plaster is used primarily for finishing ceilings and walls of residential premises. Gypsum plasters can be used for interior work and other rooms with nominal humidity. It can be technical blocks, offices, or shopping centers.
- Plaster mixtures based on gypsum can be put on the foundation:
- From a brick.
- On the clay walls.
- On top of concrete walls and cement plaster, subject to surface treatment with concrete contact.
- You can work on the old, but durable gypsum plaster.
- Cellular foam concrete, aerated concrete.

In addition, gypsum mixtures can appear in the form of:
- Starter material, or finished solution.
- Finishing compounds with a fine grain fraction.
- Decorative compositions.
Composition of gypsum plaster
Answering the question of what gypsum plaster consists of, we can briefly say so. Gypsum powder is the basis of the whole composition. It is he who binds together all the elements. It is made from a natural mineral. In this case, the powder is ground and undergoes a lengthy heat treatment process. It should be noted that the gypsum included in the composition may be of different fractions. The finer the grain, the better the surface will be processed.
Fine-grafted filler of natural or synthetic origin is added to the mixture. Often used polymer additives.
It is important that the shape and size of the grains of the filler significantly affect the final result of the treated area.
Fillers reduce the consumption of gypsum plaster, adding strength to the working surface.
Polymers increase the elasticity of the material and increase adhesion to various substrates, which is important.
Gypsum plaster withstands temperatures in the range + 5 .. +30 0 C. The recommended thickness of the working layer, excluding the reinforcing mesh 5 mm. The dry mixture is diluted in proportions: gypsum plaster one part, water 0.5 part. The estimated material consumption per 1m 2 is 8 kilograms.

The solution dries on average in one hour, and for the final drying will take at least 3 hours. In seven days, the solution acquires 100% strength. And yet: the thermal conductivity of the mixture made on the basis of gypsum 0.23 W / m * C.
Indicators may vary slightly. It all depends on the manufacturer and the components used..
In the distribution network, you can purchase universal gypsum plaster in the form of a powder mixture. It is sold in paper bags of various weights.
To prepare the working solution, you will need water, which with a certain adjustment can change the fat content of the composition. It all depends on the nature of the proposed work.
For example, dense plaster is used to seal cracks or rough work. For the final alignment of the walls on the prepared surface and for decorating the object should use a liquid solution. It is important that he spreads well on the wall.

The procedure for applying gypsum plaster
Despite the popularity of the product we are considering, many do not know how to properly apply gypsum plaster on the wall. But this is an important issue. If the installation technology is violated, in the end, the desired (high-quality) result will not be achieved.
In the process of work, important nuances must be taken into account:
- Be sure to apply the finished mixture only on a pre-prepared surface, which must be cleaned of dirt, dust and pre-treated with a primer. This will give a high adhesion of the working composition to the surface, increase adhesion.
- Before applying the composition, you should determine the thickness of the working layer. If you intend to apply a thin layer, the composition should be liquid. If you treat the work areas with a thick layer, the composition should be more dense and not spread over the wall.
- The distribution of the finished mixture on the working surface is carried out with a spatula, alignment with the rule.

Gypsum Wall Plaster Technologyat the initial stage, it means distribution and alignment in a horizontal position.
The second layer is distributed in an upright position. The following layers can be applied after the previous layers have dried. To do this, take a technological break for 3 hours.
Do not forget that the life of the finished mixture is small. Therefore, at one time, experts recommend preparing a small amount of the mixture.
Preparing walls for plastering

How to apply gypsum plaster, and what t 0 mode to use? Speaking about the temperature of the room where the work is carried out, experts recommend preparing the walls for plastering with positive indicators: 5-30 0 C. Preparation includes cleaning the walls of dirt and dust. It is necessary to remove the layers. This may be a layer of old plaster, or other contamination.
It is important to remove staples, nails and metal hooks during the preparation of the walls. Those that cannot be removed should be treated with anti-corrosive material.
If the work surface is brickwork, cement-limestone plaster, gas and foam concrete (materials that abundantly absorb moisture), they should be carefully treated: coated with a primer. We must not forget about another stage: the preparation of materials and tools.

- A bucket, preferably plastic, with a capacity of 10-20 liters for mixing the solution.
- Shovels and plastering trowels for applying the finished solution.
- Lighthouses to create a flat surface.
- Spatulas for plastering.
- Plaster corner for the formation and alignment of external corners.
- Rule for leveling the solution layer.
- A grater used to level the finish mix.
- Steel trowel for sealing the applied mixture.
- Construction mixer for kneading a portion of mortar.
The work should be carried out in special clothing related to personal protective equipment. Protective gloves should not be neglected.
Preparation of plaster mix
Dry plaster gypsum mixture must be poured into a pre-prepared container at the rate of one kilogram of dry matter per 0.5-0.7 liters of water. After a simple calculation, you can find out that for a 30 kilogram bag of dry mix you need 15-21 liters of water.

The cement-sand mixture must be thoroughly mixed with water, bringing the composition to a homogeneous mass. There are two ways to prepare the solution:
- manual way
- mechanical cooking option. You can use a hand-held electric drill with a nozzle, or use a professional mixer.
Do not use the mixture just prepared - let the solution stand for 5 minutes. Then again you need to repeat the mixing process.
The prepared solution is recommended to be used within one and a half hours. Do not add other components to the finished mixture.
Surface leveling using beacons
When aligning the walls with beacons, it is necessary to install guides. It is for them that further alignment occurs. It is important to control their placement in the horizon. Experts recommend installing beacons so that the thickness of the applied mixture is minimal.

- Firstly, it reduces material consumption.
- Secondly, the mixture dries quickly, therefore, work progresses quickly.
In the work, you can use the beacon profile. These are (guiding beacons) perforated rails made of galvanized metal resistant to corrosion. The length of the rails is 300 millimeters, and the width is within 6 mm.
Decorating without beacons
There is another way to plaster walls with gypsum plaster without using beacons. The process may be accompanied by the use of reinforcing mesh, or without it.
Basically, this method is suitable for performing a decorative layer and, if necessary, slightly level the surface. It is important to use the rules to determine the deviation of the plane.
To do this, press it to the work surface. If there are hollows, they must be thrown with a small amount of solution and stretched over the working surface.

If there are obvious protrusions, they are cut off with a grinder or removed with a puncher and the problem area is treated with the method described above using a spatula or trowel. Once again, check the rule, find out how smooth the plaster layer is. If everything is normal (there are no gaps between the tool and the wall), you can go to another section.
Allow some time to harden the plaster and putty again. As a result of the described actions, the wall will be ready for subsequent finishing. For example, wallpapering.
When preparing the surface, it is important not to miss the cracks. They should be treated, putty and apply a primer coat.
Comparative characteristics of plasters from different manufacturers
The modern construction market offers a large selection of gypsum plaster. Interesting mixtures are Volma plaster, a layer of which can be applied to walls and ceilings, followed by cladding. The dry mix for manual application of Volma is a mixture of a light astringent composition using the highest quality chemical and mineral additives.
Another popular brand known to Russians is Knauf gypsum plaster. Products are more expensive than the above goods, with high quality components used.
 Knauf Rothband is a gypsum-based dry mix. As additives, polymers and lightweight aggregates are used. The mixture has a high degree of adhesion and holds well even on smooth surfaces. The products in question can be used on a concrete or brick surface. It is possible to work in rooms with high humidity.
But Timmaxplastt 25 is designed for the treatment of walls and ceilings of rooms with moderate humidity.
Recently, the products of the company "Prospectors" have been gaining more and more popularity. This domestic brand makes plaster on the basis of cement and gypsum of high quality.
Finally
You can choose any dry product and prepare a working mixture. However, with all the diversity, there are sales leaders. Do not forget about the recommendations of specialists in terms of the preparation of mixtures and the rules for their application.
How to work with gypsum plaster: educational program for beginners
 Improving technology leads to the birth of completely new materials that are easy to use and effective in use.
Today there is a large selection of gypsum-based mixes for indoor decoration. Their task is to correct the actual surface and prepare for a fine finish.
Gypsum plaster for decoration: features and specifications
One of the materials used to adjust walls is called dry gypsum plaster. It differs from traditional ones in that the composition contains special additives that give it specific properties.
- Plastic. The mixture is easily applied to the surface, which allows to obtain a minimum plaster layer of 3 mm.
- Non-stop. The material retains its shape after drying, does not form cracks and does not require surface refinement.
- Low density. Low specific gravity and good viscosity make it possible to apply a coating layer of up to 70 mm without the risk of tearing off the substrate. This is especially important for large wall plane differences.
- Quick setting. The mixture hardens within 30 minutes and completely hardens after 2-3 hours.
Work sequence
 Plastering is divided into the following stages:
- determination of the degree of unevenness of the walls (hanging),
- elimination of defects and preparation for priming,
- processing the base with special compounds,
- preparation of material for work,
- plastering,
- removal of small shells.
To assess the condition of the surface finish, it is hung. On both sides of the wall, they retreat 20-30 cm from the corners above and below, drill holes for dowels and tighten the screws. With their help, after fixing the plumb line, a minimal layer of plaster is pre-set. Then, the threads are tied to the heads of the screws vertically, horizontally and two diagonals. The places where they touch the surface indicate protruding elements and determine the final thickness of the coating.
 To eliminate any defects in the base (sagging, protrusions, remnants of reinforcement), a hammer with a chisel or a perforator is used as a tool.
Often, in the process of plastering, a thick (over 30 mm) layer is obtained, therefore, for better adhesion to the wall, a metal mesh is used.
Next, the base is treated with special compounds. To strengthen the lower layers of the old coating, deep-penetrating soils are used, and to enhance the adhesion of the plaster to the base, soils that improve adhesion are used.
After this, a gypsum mass is prepared by adding a measured portion of the material to the water and mixing until a homogeneous composition is obtained.
To facilitate the work, additional devices are used - beacons. They serve as limiters for the mixture during leveling and form the coating plane.
The prepared mixture is spread onto the surface with an L-shaped spatula and a couple of times the rule is carried out along the lighthouse guides, cutting off the excess. After the material has hardened, but still remains wet, beads are necessarily removed. This is especially important if the layer is more than 3 cm. For this, the rules are stretched several times on the seam with an acute angle.
Completion of work
 Due to the content of the coarse fraction of the filler in the composition of gypsum mixtures, the finished surface does not turn out smooth. To fill small sinks, it is covered with a material consisting of half of a stucco mixture and a finishing putty.
Finishing after gypsum plaster
After the coating dries, the walls can be putty, after removing roughnesses along the entire plane with a wide spatula. Then the surface is sanded and primed again. Finishing repairs are finishing work: painting, wallpapering, applying decorative plaster.
When choosing a material for decoration, the operating conditions of the room should be taken into account to prevent surface destruction. In this case, repairs will not be required for a long time.
Foundation preparation
Wall preparation is standard: cleaning, dust removal, priming. Consider some issues regarding the preparation of walls for plaster.
Do smooth concrete need additional processing? Often, concrete contact primer is applied to concrete surfaces - more often this is an unjustified consumption of materials. Gypsum plaster adheres well to a concrete base, provided that it is clean and free of oil stains. The exception is very smooth concrete like polished.
If previously the remains of alkyd enamel were removed from the concrete surface, then "concrete contact" is recommended - the enamel clogs the pores in the concrete and even after removing paint from the surface, the general adhesion is low. In such situations, you can do without special primers, making numerous notches on the walls, but this is a time-consuming process.
In places where it is impossible to remove the old paint and there are extensive "non-sticky" places, you can screw the screws (pre-drill the wall) so that they hold the plaster with their hats. However, you should not use this technique without special need - the metal in the gypsum tends to rust, even if the screws are galvanized. At least the hats of self-tapping screws should be tried to sink deeper relative to the surface of the future plaster.
Marking and installation of beacons
Before installing beacons, regardless of their type, you need to measure the walls for deviations from the vertical. If geometry is required (clear angles of 90 degrees), then axes and perpendiculars on the floor are drawn on the floor - these lines will be guidelines for the installation of beacons. The drawn axes can be used to judge the acceptability of geometry in general. Indeed, huge deviations occur and in order to make angles of 90 degrees, sometimes it is necessary to apply layers of 10 cm or more. In such cases, the question arises sharply - do you need geometry at all? Often there is no need for it.
It may be useful for you to read the guide on marking right angles and perpendiculars using tape measure.
A reasonable question: initially, when the geometry of the room is not known - how to draw a base axis? It should be guided by the longest and most evenly flat wall. Putting aside a parallel line from such a wall, the rest are evaluated. Perhaps the axis will have to be adjusted to achieve the minimum layers on all walls.

* Distorted geometry of the walls shown for clarity. .
The peak of perfection is the layout of all rooms in a common geometry. However, it is worth remembering the advisability - often these are useless gestures.
So, to install beacons from a special profile or from a stucco mixture, it is necessary to mark future beacons. Practice shows that plastering is more convenient to produce with vertical stripes 1-1.2 m wide. Therefore, walls are marked with vertical lines. In the inner and outer corners, you should deviate from the corner by 10-20 cm. In general, beacons can also be set horizontally, followed by pulling from left to right (or vice versa), but this should be done for good reason - plastering in this way is less convenient. rather than bottom-up.
It is recommended to set self-tapping screws for both grated and lighthouses from the profile, which with their hats will interfere with the curve installation. We will consider this moment a bit below. Self-tapping screws are set vertically and plane, some do it at the usual level or laser - this is a relatively suitable method. This method will allow fairly reasonably plastering under tiles or other coatings that do not require an ideal plane.
For high-quality installation of beacons, it is necessary to build a frame.

The frame consists of: four kapron threads (black in the picture) forming a frame, loops at the ends of the threads, allowing them to move on nails (four black dots). The frame is set in an exact vertical plane using threads with plumb lines (blue lines with orange tips) - instead of plumb lines, you can use the laser level. The horizontal blue line is the thread on loose loops, allowing it to ride along the frame. Using a moving thread, the entire rough wall is evaluated for protruding sections. Red dotted lines are future lighthouses, the frame should go beyond the extreme lighthouses.
To set the frame in accordance with the geometry of the room (if it is planned and the axes are marked on the floor), the plane of the frame is combined with the markings on the floor using plumb lines or a laser level.
When the frame is installed and adjusted, the moving horizontal thread is a guide for setting the beacon screws, about them a little lower.
In general, the marking of the vertical lines themselves, where the beacons will be installed, should be done before setting the frame. Angular beacons should be placed with gaps from the walls of 15-20 cm or more for comfortable positioning of the frame, and for more convenient work as a rule when plastering. The lighthouse and the lighthouse following it must be marked at such a distance that, when resting on them, the rule reaches the corner.

The distance between the beacons should not be made too large, even if the length of the rule allows it. The optimal distance between plaster beacons is 100-120 centimeters. With a greater distance, the complexity of the process increases and sometimes quality suffers.
Also, before pulling the frame, it is necessary to drill holes for self-tapping marks on the marked lines of the lighthouses, which will be the basis for future lighthouses. Of course, this can be done even after setting the frame, here it’s more convenient for anyone. The number of holes for screws depends on the type of beacons.
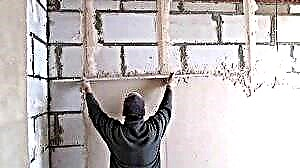
There are two main types of lighthouses for plastering: this is a lighthouse profile or from a stucco mixture. It is difficult to say which type of lighthouse is better, it is more a matter of personal preference for the plasterer.
Lighthouses from the lighthouse profile They are quite simple to install, they are not shuffled by the rule. However, they require mandatory removal from the walls after solidification of the stock solution. Also, these beacons have a thickness (6 or 10 mm.), So the minimum layer of plaster from 6 mm. In problem areas with a thin layer, you can "pinch" under the beacon to reduce the layer.

These profiles are placed on special fasteners (clips) created specifically for this profile or simply on the plaster of the mortar (under the staples is a self-tapping mark). In both cases, self-tapping screws are placed with an interval of 30-40 cm, a more rare installation will lead to deflection of the profile during plastering. Actually supporting self-tapping marks and are exposed in one plane using the above frame.
When the frame is made and adjusted to the plane and the vertical, the self-tapping screws are adjusted using a movable thread. Ideally, the head of the self-tapping screw should not barely reach the thread - so that there is confidence that the self-tapping screw does not touch the thread and at the same time be as close as possible. Thus, all twisted screws will be in the same vertical plane with their hats.
During alignment of the self-tapping screws, it is necessary to take into account the thickness of the beacon itself, and in the case of clips, its thickness is also 1-2 mm. In other words, when adjusting vertically, the frame must be pushed to the wall by the thickness of the beacon 6 or 10 mm. (two varieties of beacon profile).
"Grated" beacons made of stucco or putty it is possible to set it to any layer thickness from 0 mm. There is no need to remove something from the walls after leveling. The disadvantages include: more movements when creating, torn out by the rule with excessive zeal. The main drawback is that you can start plastering work only the next day.
However, the technology of "rubbing" is considered to be of better quality, subject to some experience.
There are various ways to create beacons from a stucco mixture, consider the most reliable (in my opinion). As auxiliary elements, a profile for gypsum board PN27 * 28 is used, it is advisable to take them from metal thicker. Profiles can be used many times and, as a result, can be used for their intended purpose.
Profiles are cut to the height of the walls, if they do not have factory holes for fixing dowels - drill holes Ø 5-6 mm. at intervals of 50-70 cm. The profile is applied to the place designated for the lighthouse and through the holes marks are placed on the wall - these are places for future temporary fastenings. In just a couple of centimeters from the marks, another hole is marked. As a result, several pair of dowels for self-tapping screws should be inserted on the wall for each lighthouse - one screw for alignment along the frame or laser in a clear vertical, another for fastening the PN profile.

Then the screws are set vertically and plane (frame or laser level). The guide profiles are fixed with a second pair of screws so that the fasteners do not fall into the profile holes too large; you can use improvised "washers" from the pieces of the suspension. Lighthouses are ready to fill.
In the space between the wall and the profile, the gypsum mixture is clogged - the same with which it is planned to plaster or with the "fugen" putty. It is necessary to carefully approach the filling, pressing the mixture with a trowel, so that there are no voids.

The next day, the profiles are removed, the supporting screws are unscrewed, the gypsum beacons are slightly cleaned at the edges. Everything is ready for applying plaster.

On walls where there are external corners, you can simplify the task - to wind drywall or a wide profile, the end of which will serve as an extreme beacon. The method is good for plastering columns and piers.

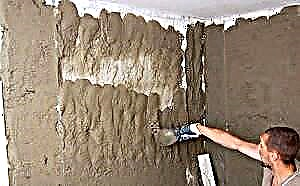
Plastering process
For an inexperienced worker, it is better to shut the gypsum mixture in small portions until an understanding of the optimal volume of the batch appears. The fact is that the “life time” of the gypsum mortar is about 20-30 minutes (it may differ for different brands and manufacturers) and you can simply not have time to throw the mixture onto the wall.
The finished plaster is thrown on the wall section between the beacons with a small trowel. For better adhesion to the base, I recommend that you first “rub” a thin layer into the wall, and after that pour the bulk. For "rubbing" a metal platform with a handle is very convenient, for local leveling it is also suitable.
Having thrown part of the wall (between the lighthouses, at least a third of the height), the plaster mixture is treated with a trapezoidal rule. At first, the gypsum mass is smoothed a bit so that the entire treated area between the beacons is filled with a small “exit” from the plane. Then, keeping the rule perpendicular to the wall and lighthouses, remove the extra layer of plaster. It is necessary to try to level the layer in 2-3 passes with the rule, so as not to disturb the plane of the beacons (if they are from gypsum mixture) and not to spoil the rule ahead of time - it is also quite active.

If gaps between the rule and the gypsum mass are noticeable during the perpendicular run, you must also apply and repeat. Do not get hung up on the presence of local, smaller than cherry shells and hollows, it is better that there are no protruding sections. Small potholes are perfectly sealed with putty, but our main task is a flat plane, albeit not quite smooth.
No matter how you try, but after the passage the rule will be a barely noticeable “bulging” of the raw stucco from the plane of the lighthouses. This phenomenon occurs due to the surface tension of the mixture that has not yet solidified. Therefore, gypsum plaster must be trimmed after some time, but more on that below.
If necessary, alignment with layers of more than 5 centimeters, the work should be carried out in two stages - two layers. Otherwise, the plaster may crack from shrinkage processes and dry for too long. The first coat needs to be applied especially without smoothing, the main thing is that there is no way out of the plane. After application, a comb spatula must be walked over the surface to form the comb. Thus, the second layer will be something to catch on.

When applied in two layers, you must at least wait for the first layer to set before applying the second. In other words, the second coat is applied no earlier than the next day. On the good side, if there is such an opportunity - let the layer dry longer.
Sometimes there are passing pipes near the walls and the rule simply does not crawl between the gap from the wall. In such cases, it is appropriate to use the rigid profile PN27 * 28. The profile is attached with both sharp edges to the lighthouses and leveling is carried out.
During operation, it is very important not to get carried away and have time to trim the clutching plots of the plastered walls.
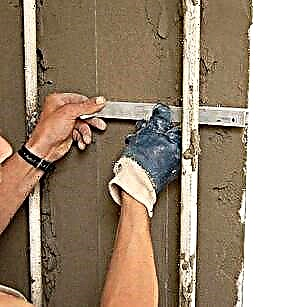
Plaster cutting
A very important and necessary stage that cannot be ignored! As it was written above, the freshly applied mixture sticks out a little from the plane - at first glance, quite a bit. However, if you substitute a 2-meter rule on a dry wall, then the difference is 5 mm. will be commonplace. Therefore, it is so important to trim the setting layer.
It is difficult to say at a glance how long it takes to cut the plaster - it affects the brand of the mixture, the humidity of the room and the water absorption of the base. Therefore, it is so important to determine this time yourself. About what time you need to focus on - 30-50 minutes after application.
The appropriate moment is determined as follows: the gypsum mixture has lost mobility and does not change from light touches, but it is easily pressed through with your fingers. During the run, the rule does not spread the bulk, but protruding sections are cut off with some effort.
To trim, you must also keep the rule at right angles to the plane and make passes from top to bottom and from bottom to top several times. The rule can be pressed harder than when leveling the liquid mixture.

In addition to vertical rule movements, it will be very useful to work them diagonally. If the mixture is strong enough, then you can put the rule vertically, without relying on beacons. In a good version, deviations from the ideal plane should not be observed for any position of the rule (vertical, horizontal and oblique), the gaps should be no more than 1 mm. (and this is even a lot ideally).

Drying walls and further finishing
It is recommended to dry the walls well before further finishing. At a minimum - you need to wait for visual dryness when there are no damp spots on the surface. When applying waterproofing, I highly recommend waiting for the walls to dry completely! This can be checked by drilling a small hole in the thickest part of the plaster.
Although, for example, gypsum putty "fugen" can be applied to an dry surface. It is better not to prime the non-dried surface - drying will go slower.
If tile laying is provided, surface drying is mandatory. When using polymer putties, it is also better to wait until there are wet spots on the surface.
By the way, some manufacturers of stucco mixtures prohibit artificially drying walls with heat fans and guns. Personally, I did not have to observe the negative consequences of such drying, but in principle I do not exclude them. Most likely, the manufacturer is afraid of excessive temperatures and humidity in a small enclosed area. Therefore, if dried, then carefully and without fanaticism!